2012-08-01
Abstract
Recently, we have seen a new trend in ZAccess: less is more. In around March 2012, the aggressive self-defence technique had disappeared from some variants, and in June 2012, the whole rootkit was removed, making it a completely user-mode piece of malware. Neo Tan and Kyle Yang describe the details of the latest versions of ZAccess.
Copyright © 2012 Virus Bulletin
ZAccess is short for ZeroAccess; it used to be a kernel-mode botnet that came with a very sophisticated rootkit. It was infamous for its ability to kill the processes trying to attach to it and access its hidden files in ring 0. Some of its variants even packed the malicious code inside the rootkits, making it even harder to detect or analyse.
Recently, we have seen a new trend in ZAccess: less is more. In around March 2012, we noticed that the aggressive self-defence technique had disappeared from some variants. And in June 2012, the whole rootkit was removed, making it a completely user-mode piece of malware.
One reason for doing this is probably because the self-defence method it was using had been so well analysed by the anti-virus industry that it was likely to become an easy target for anti-virus detection. This change also unifies the implementation of 32-bit and 64-bit versions of the bot, as the 64-bit version has never used rootkits. Unifying them makes the two versions more alike, thus more portable/interchangeable, and makes maintenance easier.
In terms of communication, the malware has had a lot of upgrades since its earlier versions, both in its encryption routine and its communication data structure. Clearly, the focus of the malware author(s) is shifting from simply protecting every single bot locally to protecting the entire botnet by strengthening the security of communications in its P2P architecture. Table 1 summarizes the differences between a previous version of ZAccess and the latest one.
| Version around March 2012 | Version around June 2012 | |
| MSCF included files | 32.#, 64.#, fp.exe, rtk32, rtk64 | e32, e64, fp.exe, n32, n64, w32, w64 |
| Communication protocol | P2P, TCP only | P2P, UDP and TCP |
| Communication encryption | RC4 with static key: the md5 of 0xCD6734FE | XOR with modifier for the UDP and RC4 for TCP communication with dynamic key |
| Commands | getL, retL, getF, setF, srv?, yes!, news | getL, retL, newL,getFile, sendFile |
| Self-defence method | 1. Use driver to access the hidden files. 2. Downloaded files have a signature in their resources to be verified as ‘legit’ files. | 1. Driver no longer used to hide files. Instead, the property of the installed files is set to hidden. 2. Both the traffic and downloaded files have signatures to be verified to prove their integrity. |
Table 1. Differences between earlier and later versions of ZAccess.
The latest ZAccess installer included an embedded MS Cabinet file which contains the files to be installed. There are different filenames in that cabinet file, based on different computer architecture (32 bits versus 64 bits). We will focus on the behaviour of the latest ZAccess version on 32-bit computer architecture. The files are as follows:
e32[e64] – This is the DLL to be injected, very similar to an unpacked version of n32 (not in the previous version).
fp.exe – This is the old version of the Flash Player installer for an installation method used by this malware to bypass the UAC in Windows Vista and Windows 7.
n32[n64] – This is the DLL used to inject into the explorer.exe process. It will be the drop-file ‘n’. This is the main file that is responsible for communicating with the other bots.
s32[s64] – This is a list of 256 peer IP addresses, which will be the base version of file ‘@’.
w32[w64] – This is the shellcode used to inject the system process services.exe, which can only be used when a flag is set. It has the ability to search for a file’s extended attributes and execute their content. It could be used when the situation does not allow direct injection of DLL e32 [1]. This shellcode was hard-coded inside the installer in the previous version. Now it is more flexible.
At the beginning of the installation process, the malware will still try to disable Windows Defender, Action Center Services and some forensic tools such as IceSword and InstallWatcher. In the previous version, the injection routine and the injection DLL were encrypted inside the ‘rtk32’ driver file. That driver also contained a rootkit to hide the installed folder and enable read and write access to the installed files. The latest version abandons this technique, dropping files in the following locations and simply giving them hidden properties:
Install files:
%WINDOWS%\Installer\{79bb545a-8497-2457-a3bc-87445a1c952f}\@ – list of peer IPs, updating in real time.
%WINDOWS%\Installer\{79bb545a-8497-2457-a3bc-87445a1c952f}\n – n32.
Downloaded files, the filename starting with 0x8000000 is the DLL file that can be loaded from the installer:
%WINDOWS%\Installer\{79bb545a-8497-2457-a3bc-87445a1c952f}\U\00000001.@ – this only contains encrypted data in its resources.
%WINDOWS%\Installer\{79bb545a-8497-2457-a3bc-87445a1c952f}\U\80000000.@ – this uses 00000001.@’s resources. It is a helper DLL that accesses and modifies the extended attributes of install files.
%WINDOWS%\Installer\{79bb545a-8497-2457-a3bc-87445a1c952f}\U\800000cb.@ – this injects %system32%\svchost.exe. The inject DLL is stored in its cabinet file system, using filename ‘noreloc.cod’. This DLL labels itself with the class name ‘z00clicker3’.
After injecting the system process explorer.exe, it modifies the registry: HKLM\SOFTWARE\Classes\CLSID\{F3130CDB-AA52-4C3A-AB32-85FFC23AF9C1}\InprocServer32 from ‘%WINDOWS%\system32\wbem\wbemess.dll’ to ‘%WINDOWS%\Installer\{79bb545a-8497-2457-a3bc-87445a1c952f}\n’ in order to auto load the bot’s DLL every time the system starts.
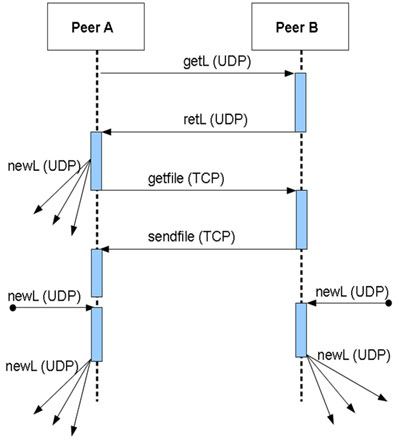
During the installation, the DLL e32 is injected into the explorer.exe process. The main purpose of this injection is to communicate with other peers to get the updated peer list and download the latest components. Figure 1 shows a diagram of the peer-to-peer sequence.
Initially, the bot sends an encrypted getL message with format: |crc32|getL|0000000000|random| to all the peers stored in the original ‘s32’ file. One of the active peers will reply with the encrypted retL message.
The data can be decrypted using the algorithm described in the following pseudo code:
for(i = 0; i<data_length; i++;)
{
key = “ftp2”;
data[i] ^= key;
key = key<<<1;
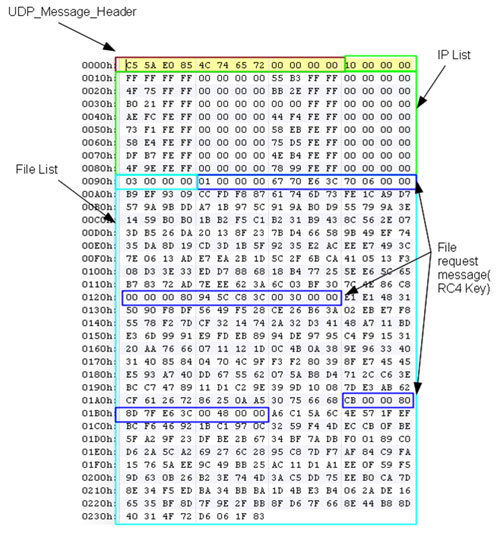
}The retL message contains both an updated peer IP list and a file list. Figure 2 shows an example of the decrypted retL data.
The retL data can be divided into three parts: header, peer list and file list.
The getL and retL message share the same header structure, with the exception of the fact that in the getL message there is a random dword at the end. This is generated by calling the CryptGenRandom API. In the retL message, there is more data appended after the header.
typedef struct UDP_Message_Header {
     DWORD crc32;
     DWORD command;
     DWORD newL_flag;
}
crc32: The crc32 hash of this message, with this field filled with 0s.
command: There are three kinds of commands: getL, retL and newL, which is fewer than in the previous version.
newL_flag: This determines whether the peer will broadcast newL messages.
The first dword (10 00 00 00) is the size/count of the following data, the peer IP count in this case.
This retL command contains 16 peer IPs in the list, each entry containing two dwords (eight bytes). The first dword is the IP address and the second dword is the active time. This value will be used to calculate the peer timestamp when parsing. After the calculation, the IPs will be sorted by timestamp, with the earliest at the top, and stored in the ‘@’ file. Any invalid IPs (such as 255.255.255.255) will be skipped when parsing.
In Figure 2, the first dword after the peer list indicates that there are three file entries. Each entry in the file list has 0x8C bytes. The data structure of each entry is described as follows:
typedef struct File_Entry {
     DWORD filename;
     DWORD timestamp;
     DWORD fileszie;
     Byte signature[0x80];
}
filename: Specifies the filename stored in the bot.
timestamp: This is calculated by calling the GetSystemTimeAsfileTime API and then RtlTimeToSecondsSince1980. This is how it calculates the IP timestamps as well.
filesize: Specifies the file size.
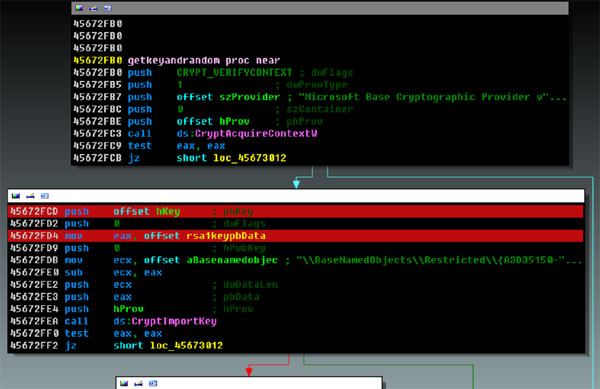
signature: This will be used by calling the CryptVerifySignatureW API to verify the md5 of the first 0xC bytes (filename, timestamp, filesize) of this entry. The public key is stored in the installer file. Figure 3 shows how the public key is imported into the bot.
This is a newly added integrity check in the latest version of ZAccess. It calls the CryptSetHashParam API with the md5 of the first 0xC bytes of the File_Entry (e.g. ‘01 00 00 00 67 70 E6 3C 70 06 00 00’ in Figure 2) as pbData, to prepare the handle of a hash object. Then it calls the CryptVerifySignatureW API to verify the hash object with pbSignature obtained from the later 0x80 bytes of the File_Entry (e.g. ‘B9 EF 93 09 CC … &C 4E 86 C8’ in Figure 2), using the hPubKey parameter obtained in Figure 3.
By doing so, each file entry has its own integrity checking; this makes it harder for analysts to modify file request commands or replace files in the traffic. In [2], the author proposed an interesting method for taking down the botnet – ‘to inject a poisoned pill into the U directory of one of the peers’ – because at that time, this integrity checking was not yet present. Now, the presence of integrity checking makes the implementation of this idea a lot harder. And later on, once the file is downloaded, there is another similar signature verification just before the file is loaded, which makes it even harder. However, it is still feasible as we have figured out how this integrity checking works.
There are no longer any ‘getF’ and ‘setF’ commands. After parsing the retL message, the bot sends a command to get the files. It uses the TCP protocol to do so, as using UDP to implement file downloading with the consideration of packet loss and arrival order is quite complicated. The file request message is in plain code (not a good idea) e.g. the message requests a filename ‘00000001’ with timestamp ‘3CE67067’ and the size 0x670 is: ‘01 00 00 00 67 70 E6 3C 70 06 00 00’, which is exactly the first 0xC bytes just before the signature in the file list (highlighted in deep blue in Figure 2).
The file that is sent back will be decrypted using the RC4 algorithm, in which the key is the md5 of the file request message: ‘01 00 00 00 67 70 E6 3C 70 06 00 00’. In this way, each file is encrypted with a different key via the RC4 algorithm, which is a dynamic encryption routine as opposed to a fixed key used in the previous version. This is quite an improvement from the previous versions in protecting the communication data. After downloading the file, the File_Entry data will be stored temporarily in the file’s extended attributes for future use.
Before dropping and running the downloaded file, the CryptVerifySignatureW API is called again to verify the file with the same public key. The procedure is very similar to the integrity checking of the File_Entry:
It loads the downloaded file into memory as an image, and calls the RtlImageNtHeader API to verify that it is an MZ file.
It uses a special routine instead of the LoadResource or FindResource APIs to load the last resource. (In previous versions, it actually looked for the resource with the name ‘33333’, which was easily discovered by anti-virus analysts.) It calls the RtlImageDirectoryEntryToData API with the third parameter set to 2 to get the resource directory entry address. Then it parses the resource table and finds the last resource with the name ‘33333’. At the end it calls the RtlAddressInSectionTable API with the third parameter set to the offset of the last resource so that the return value is its virtual address in memory. The APIs used here are from ntdll library, undocumented.
It copies the contents of the last resource (‘33333’) to another temporary memory. The data is the signature with size 0x80 bytes. It temporarily fills the resource field in the image with 0s.
It calculates the md5 of the image.
It copies the signature back to the image.
It calls the CryptSetHashParam API to prepare the handle of a hash object from the md5, and then calls the CryptVerifySignatureW API to verify the signature obtained in step 3.
After the verification, it calls the LdrGetProcedureAddress API to get the call address export function with ordinary #2 and then calls the RtlImageDirectoryEntryToData API again for the manual importing of all the required libraries before it calls the exported function. It also passes through the right parameters, so that the downloaded file can be loaded successfully. (This explains why if you try to run the downloaded DLL independently, it will not be loaded properly.)
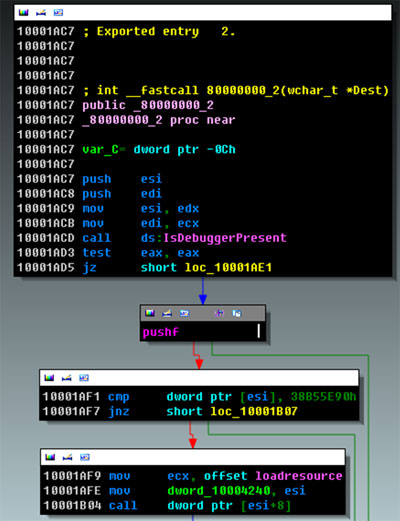
Figure 4 shows how the downloaded file 80000000.@ interacts with its calling process. At virtual address 0x10001AF1 and 10001B04, it compares data passed inside [ESI] and makes a call back to its caller.
This command is not normally used. However, if a (fake) peer A keeps feeding peer B with dead IP addresses with a large active timestamp, B will soon become dead because its peer list will be filled with 256 dead IP addresses (thus B will be unable to connect to the botnet to get updates). When this happens to a large list of peers, it is a catastrophe for the botnet.
This is where the newL command comes in; it could be used by the botmaster to insert active peers (or update servers) to the dead peers’ IP lists in order to revive them. We have not yet seen any newL commands being sent – the following sequence is inferred based on reverse-engineering the bot and finding out what it is capable of.
If peer B receives a getL message from peer A with the newL_flag containing a value other than zero, it will send back a regular retL message to A, with the newL_flag set to the same value. Then peer A will broadcast a newL message to its 16 latest IPs in the IP list. The newL message is formed as: |crc32|newL|80000000|peerB’sIP|. The peer that receives this newL message will store the IP and then broadcast the same newL message to the 16 latest IPs in its IP list.
The getL message step seems redundant here, because all the botmaster needs to do is to send a newL message to initiate the broadcasting. The reason for adding this extra step is probably to conceal peer A’s IP address (location) from the public.
As we can see, the time period between the two versions is short. And this will undoubtedly not be the final version of ZAccess – it is still evolving and has a lot of areas which need improving. However, by dissecting this version of ZAccess, we have gained a comprehensive idea of where it is going and how. When the next version comes, it won’t be hard for us to reverse it again.