2014-03-04
Abstract
ProxyCB is a trojan that acts as a proxy server to send spam via the HTTP, HTTPS or SMTP protocol. Wei Wang and Kyle Yang take a detailed look at its installation process, how it bypasses UAC, and the final payload loading process, before dissecting its communication protocol and commands.
Copyright © 2014 Virus Bulletin
ProxyCB is a trojan that acts as a proxy server to send spam via the HTTP, HTTPS or SMTP protocol. It has been active in the wild since December 2011. ProxyCB usually has a three-level file structure: an installer EXE file, a loader DLL component and ProxyCB payload (DLL file). In this article, we’ll take a detailed look at its installation process, how it bypasses UAC, and the final payload loading process, before dissecting its communication protocol and commands.
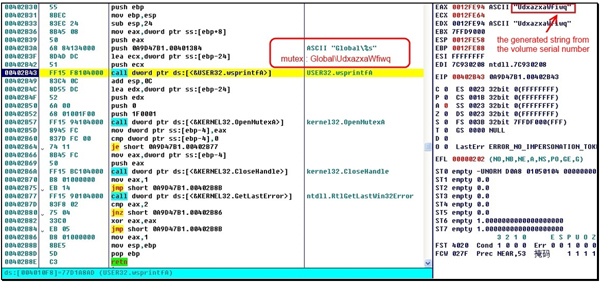
Upon executing, ProxyCB first generates a 12-letter string, which is derived from the volume serial number of the victim machine (see Figure 1) and will be used later both as a mutex name and as the filename of the dropped file.
Next, it checks the mutex (see Figure 1) to make sure the current machine is not infected, and checks the version of Windows and the user privilege level. Depending on the results, it will decide how to install the ProxyCB bot on the victim machine.
(Click here to view a larger version of Figure 1.)
User Account Control (UAC) has been part of the Windows operating system since Windows Vista. It aims to improve the security of the operating system by limiting applications to standard user privileges until an administrator authorizes an elevation in privileges. In this way, only applications that are trusted by the user can receive administrative privileges, and malware should be kept from compromising the operating system [1].
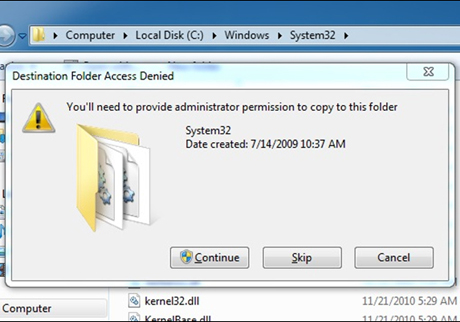
With the Windows 7 UAC default settings, if you want to copy a file into the system directory, a prompt will be displayed even if you are an administrator (see Figure 2).
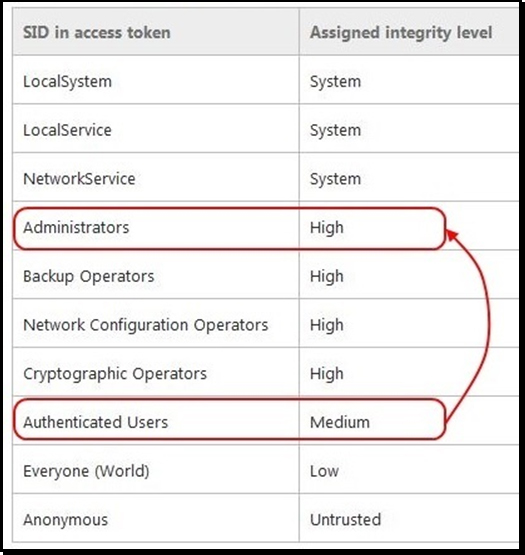
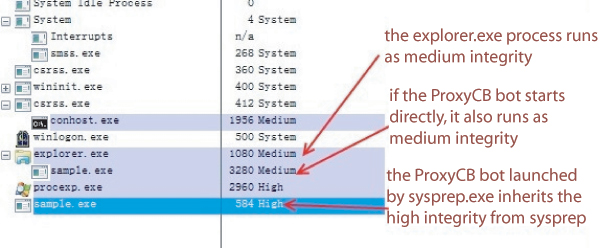
In this case, the explorer.exe process runs at a medium integrity level that only has the Authenticated Users security access token [2]. This does not have the ability to write files to the system folder. If the bot wants to drop a file into the system folder or modify the registries, it needs to gain high integrity (Figure 3). This is the first and most important part of the installation process.
With the Windows 7 UAC default settings, the ProxyCB bot can obtain high integrity without triggering any prompt, by using the following steps:
It checks and creates a mutex for the UAC pass component.
It drops a DLL file in the %TEMP% folder. The filename is made up of a random eight-digit number and the extension ‘.dat’.
It injects into the explorer.exe process to move the dropped file to %SYSTEM%\sysprep\cryptbase.dll.
In this step, the bot just needs to find a process that has been signed with the Windows Publisher certificate. These signed processes can copy files to the system folder without any prompt being displayed using the IFileOperation method, even if they are running at a medium integrity level. Explorer.exe is one of these signed processes and runs from Windows start up, so it is a good target.
It executes %SYSTEM%\sysprep\sysprep.exe, and the fake cryptbase.dll file will be loaded.
Sysprep.exe is an auto-elevation program [3] – it can automatically and silently elevate itself to high integrity, no matter who runs it.
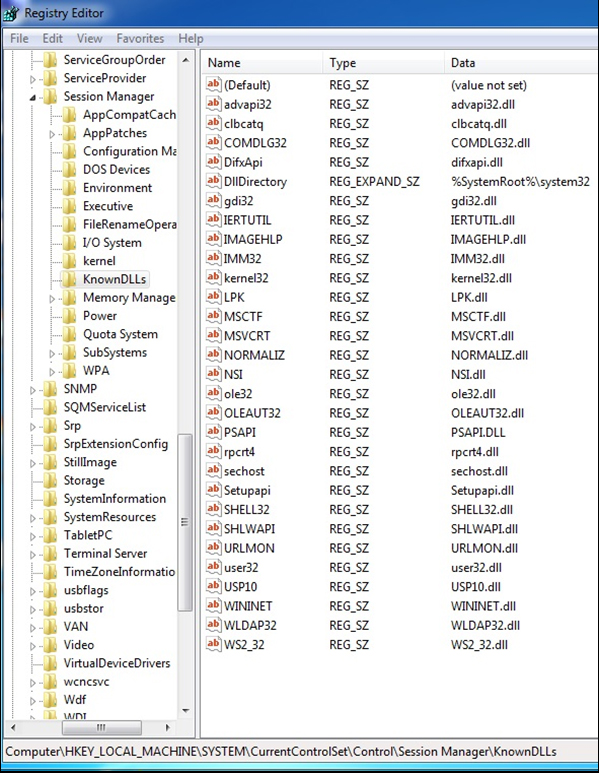
When a process starts, it will look for the needed DLL files in its own folder first, and fall back on the system folder. Although Windows has a list of ‘Known DLLs’, in which files will always be loaded directly from the system folder (Figure 4), cryptbase.dll is missing from the list. As a result, the %SYSTEM%\sysprep\cryptbase.dll file will be loaded instead of the real cryptbase.dll file in the system folder.
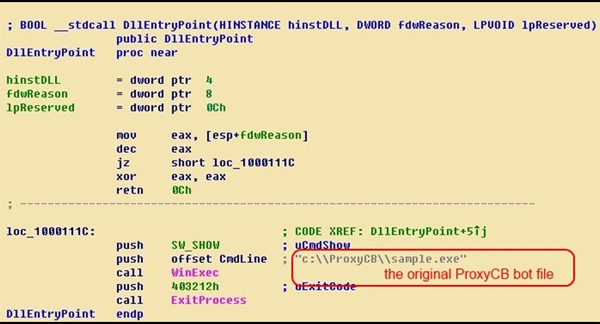
The fake cryptbase.dll is a tiny file measuring only 2,048 bytes. As soon as it is loaded, it will create a new instance of the ProxyCB installer and exit the process with a special ExitCode to notify the first installer process (see Figure 5).
Now, a new process of the ProxyCB installer starts with the high integrity level that has been inherited from sysprep.exe (see Figure 6).
The installer tries to drop a DLL component which was embedded as a resource inside itself. If the process has administrator privileges, it tries to drop the file in the %SYSTEM% folder and falls back on the %COMMON_APPDATA% folder.
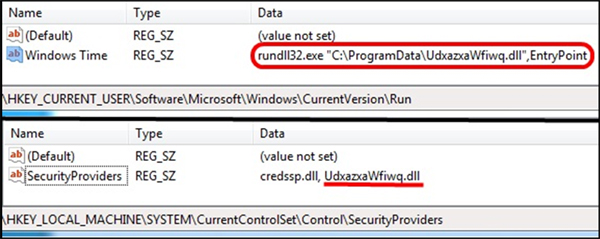
When the DLL file has been dropped successfully, the installer tries to modify the registry so that the dropped file will be loaded each time Windows starts up (see Figure 7).
If the process has administrator privileges, it will try to append the path of the dropped file after the following registry entry:
Key: HKLM\CurrentControlSet\Control\SecurityProviders
Value: SecurityProviders
If it fails, or the process does not have administrator privileges, it tries to create the following new registry entry:
Key: HKCU\ Software\Microsoft\Windows\CurrentVersion\Run
Value: Windows Time
Data: rundll32.exe ‘{The dropped file}’,EntryPoint.
By now, the dropped DLL component has successfully been installed in the system and the registry has been changed so that the component will be loaded on system start up. But the DLL has not been loaded yet. So the installer process does one last thing: it loads the DLL component.
It will try the following methods, depending on the version of the current system and the process privilege:
It executes rundll32.exe using the ShellExecuteEx method with the parameter ‘{The DLL Component}’,EntryPoint’.
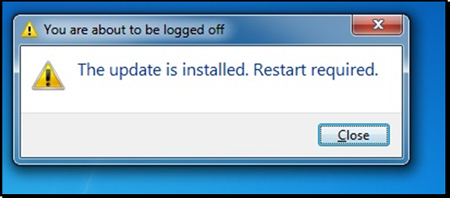
It shuts down and reboots Windows so that the DLL can be loaded when Windows starts. It will post the message shown in Figure 8, but you would be lucky to see it because the timeout is set to just one second.
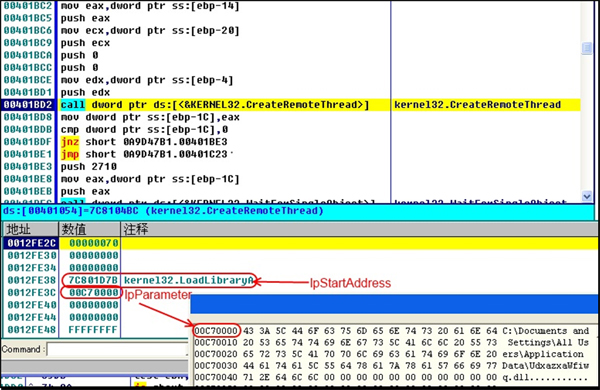
It appends the DLL component to explorer.exe using the CreateRemoteThread method. The LoadLibraryA method is used as the starting address. The path of the DLL component will be injected into the explorer.exe process and used as the parameter of LoadLibraryA (see Figure 9). This is a popular method to load a DLL file into the system memory.
It simply uses the LoadLibraryA method to load the DLL component into the current process. This is the simplest way to load the file, but this method needs the installer process to be kept alive and may cause some firewall alerts later, so it is used as a last resort.
The dropped DLL component loads the real ProxyCB payload, which will perform the malicious activities. The payload is a DLL file too, and it has no export functions except the DllEntryPoint.
When the dropped DLL component is being loaded, it checks the name of the current process first. If it finds that it is the rundll32.exe process that has loaded it (via loading method 1 or system start up with the second registry), then it tries to append itself to the explorer.exe process by creating a remote thread.
Next, it tries to load the real ProxyCB payload. It uses the VirtualAlloc method to allocate new system memory, and copies the code and data of the payload into the memory by parsing the dropper’s PE_Header. Finally, it fixes the IAT manually and invokes the DllEntryPoint.
It would be much easier to load the real ProxyCB payload using the LoadLibraryA method, but it would need to drop the file first. The bot loads the file manually, which won’t drop the real ProxyCB payload. In this way, it might avoid some file detection based anti-virus programs.
When the payload is being loaded, it first creates a mutex to avoid another instance of the installer. Then it tries to connect to the C&C server that is hard coded in the binary. It keeps trying to connect to the C&C server at 10 second intervals until a successful connection is made.
Before it connects to the C&C server, it will test for some mail servers on port 25 (SMTP). If any are accessible, a flag will be set. The host names of the testing mail servers are hard-coded (Figure 10).
The bot creates a TCP connection with the C&C server on port 1001, then sets the socket timeout to two minutes. Now, the communication starts.
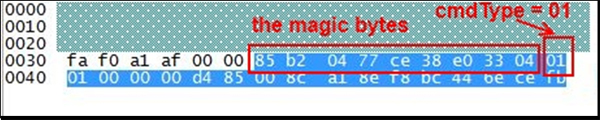
The message packet received from the C&C server has the same structure as the message packet that is sent out. The packet is 26 bytes in length and has the following layout:
struct MessagePacket {
  BYTE(9) magic;    // static 85 B2 04 77 CE 38 E0 33 04
  BYTE    cmdType;
  WORD    dataWord1;
  WORD    dataWord2;
  DWORD   dataDword3;
  DWORD   dataDword4;
  DWORD   dataDword5;
}MessageSend, MessageRecv;
When the communication starts, a phone home message is first sent to the server to register the victim machine as a client. This packet contains two DWORDs of information based on the victim machine. The first DWORD is one of the following – it checks and selects the first valuable data (not 0, 1 or -1):
The volume serial number of the victim machine
The hash value of the computer name
The hash value of the user name associated with the current thread.
The second DWORD is the dwLowDateTime area of the %WINDOWS% directory creation time.
The first message packet is set up as follows:
MessageSend.cmdType = 1;
MessageSend.dataWord1 = 1;
MessageSend.dataWord2 = Flag for whether the C&C server has been changed;
MessageSend.dataDword4 = VolumeSerialNumber/HashComputerName/HashUserName;
MessageSend.dataDword5 = dwLowDateTime of %WINDOWS% creation;
After the phone home message has been sent, the bot starts to receive messages from the server and takes the MessageRecv.cmdType as a command to determine what to do next:
MessageRecv.cmdType = 1: feedback for the phone home message.
MessageRecv.cmdType = 2: starts the proxy thread.
MessageRecv.cmdType = 3: retries the communication with the C&C server.
MessageRecv.cmdType = 4: keeps alive.
MessageRecv.cmdType = 5: changes the C&C server.
MessageRecv.cmdType = 6: restarts the communication with the C&C server.
When the C&C server receives the register message, it will respond with a feedback message that contains timeout information for the communication. The cmdType area of the feedback message packet should be 1. This command will reset the timeout for the communication to MessageRecv.dataDword4×2 seconds:
MessageRecv.cmdType = 1;
MessageRecv.dataDword4 = TimeOut/2;
When the communication starts, a KeepAlive thread will be launched.
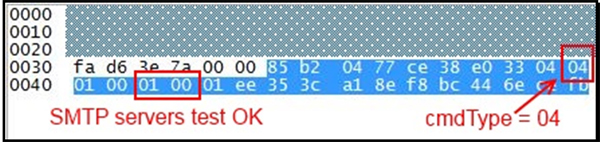
As soon as the feedback from the phone home message is resolved, the KeepAlive thread starts to send a message packet (Figure 12) to the C&C server periodically:
MessageSend.cmdType = 4;
MessageSend.dataWord1 = 1; static
MessageSend.dataWord2 = result of the test for SMTP servers
MessageSend.dataDword4 = VolumeSerialNumber/HashComputerName/HashUserName
MessageSend.dataDword5 = dwLowDateTime of WinDir creation
When the C&C server receives the KeepAlive message, it just feeds back a message (Figure 13), and the timeout of the communication will be reset:
MessageRecv.cmdType = 4;
MessageRecv.dataDword4 = TimeOut/2;
Command 5 indicates that the C&C server should be changed.
MessageRecv.cmdType = 5;
MessageRecv.dataWord2 = flag to indicate that the server has been changed;
MessageRecv.dataDword4 = new IP address;
MessageRecv.dataDword5 = new port;
The bot first terminates the communication with the current C&C server, then uses the MessageRecv.dataDword4 and MessageRecv.dataDword5 as the new host and port, respectively, to create a new connection. It then initiates the new communication with a phone home message. In the meantime, a flag will be set to indicate that the C&C server has been changed.
These two commands are similar. They both terminate the current communication and start a new one. But there are some differences between them:
Command 3 will increase a counter each time it has tried to establish communication with the current server. If the C&C server has been changed and the counter reaches a maximum number (e.g. the maximum is 10 times for the sample we looked at), it will restore the original server for communication.
Command 6 just restarts the communication with the C&C server, there is no counter.
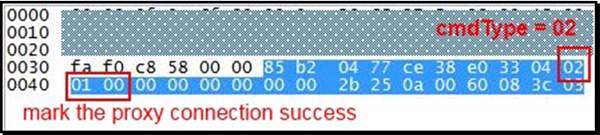
This is the most important command for ProxyCB. It creates a new proxy thread. The proxy thread will try to connect to the C&C server on another port (e.g. port 1002 was used in this case). The new port is saved in the received message packet.
MessageRecv.cmdType = 2;
MessageRecv.dataWord1 = new port for proxy thread connection;
MessageRecv.dataWord4 = tagProxyThread1;
MessageRecv.dataWord5 = tagProxyThread2;
If the connection succeeds, or it has retried three times, a feedback message will be sent:
MessageSend.cmdType = 2;
MessageSend.dataWord1 = flag for the new connection success or not;
MessageSend.dataWord4 = tagProxyThread1;
MessageSend.dataWord5 = tagProxyThread2;
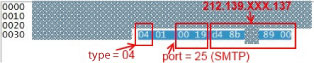
When the C&C server receives the feedback message, it will send a new message that contains IP address and port information. It usually points to a mail server (e.g. yahoo.com) on port 25 (SMTP), port 80 (HTTP) or port 443 (HTTPS).
The mail server message may have two different structure types, as shown in Figure 16 and Figure 17.
When a TCP connection is created with the mail server, the bot will act as a proxy between the C&C server and mail server.
The C&C server starts to send SMTP commands on port 25 (such as ‘HELO’, ‘MAIL FROM’, etc.) or HTTP commands on port 80 or port 443 (such as ‘GET’, ‘POST’, etc.) to the ProxyCB client.
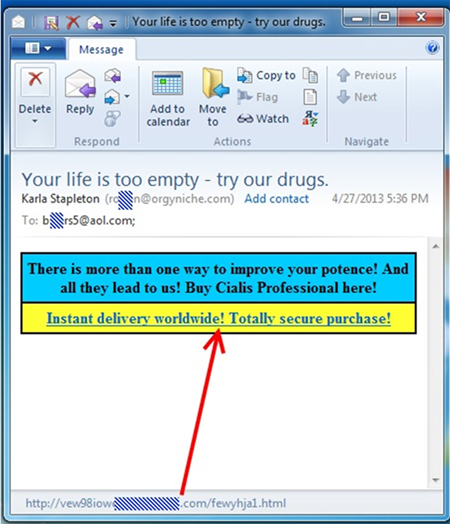
The bot receives the data and forwards it to the mail server. It then tries to get a response and send it back to the C&C server. After that, an email will be sent (see Figure 18).
Unlike other spam bots, ProxyCB does not have a component either to build the spam itself or to retrieve a spam template from the C&C server. As its name indicates, it only connects to the C&C server and forwards spam as a proxy. In this way, it is easy to update the spam content, email server and the target mailing addresses. The disadvantage of this method is that if the C&C server is not accessible, the bot will stop working immediately, and the C&C server is exposed in this case.
[1] Wikipedia. User Account Control. https://en.wikipedia.org/wiki/User_Account_Control.
[2] MSDN. Windows Integrity Mechanism Design. http://msdn.microsoft.com/en-us/library/bb625963.aspx.
[3] List of Windows 7 (beta build 7000) auto-elevated binaries. http://withinwindows.com/2009/02/05/list-of-windows-7-beta-build-7000-auto-elevated-binaries/.