CYREN
Copyright © 2016 Virus Bulletin
One of the more insidious new obfuscation techniques identified by our research team in the past year, which we believe will grow in popularity, uses a new 'digital steganography', or
concealment technique, to evade detection by conventional security tools. Digital steganography is a method of concealing a file, message, image or video within another file, message, image or video. In this case the technique is used by a piece of malware popularly known as Stegoloader (detected by CYREN as W32/Gatak), which is a trojan or downloader for stealing data and delivering ransomware.
Gatak/Stegoloader is a good illustration of the ongoing arms race between malware writers and your Internet security. A precursor to the new digital steganography technique was seen in the Duqu [1] malware (discovered in 2011), which was found to transmit encrypted data appended to an image (.JPG) file. The Zeus/Zbot [2] malware also uses similar tactics, appending its encrypted configuration file to an image file for exfiltration. However, this technique has proven easy to block using content filtering rules, because the configuration file is simply appended to the image file.
The Gatak/Stegoloader malware, which emerged in 2015 [3], improves on this steganography technique – it completely hides its malicious code within an image (.PNG) file. So far, we have seen this threat bundled in software licence cracking tools that are used (illegally) to generate software licence keys (typically to extend software trials or unlock software features without payment), but there is a high probability that new distribution mechanisms will appear.
Figure 1 shows a Gatak sample (SHA256: 0a58b98205c8542ae0516b4fe3ff8a4a6d6e9c199ec2d4e0de0aa8f9e1290328) in which two executable files are included inside a compressed archive.
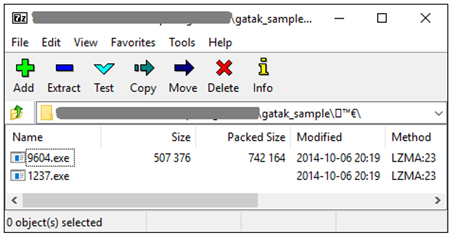 Figure 1: Gatak sample showing two executable files inside a compressed archive.
Upon execution of the installer file, the software licence cracking tool (1237.exe) runs and the window shown in Figure 2 is displayed – this is used to generate software keys for a specific software program. Of course, the Gatak malware (9604.exe) is also executed, but without the user's knowledge.
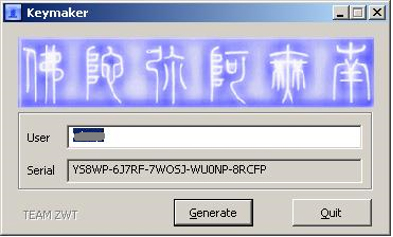 Figure 2: The cracking tool.
The malware installation is complex, with many steps, but there are two main parts:
The Gatak malware first assembles its code into memory by decrypting nine segments of the encrypted code embedded in the malware itself, and then transfers its execution to the decrypted code in memory. Figure 3 shows the size and virtual address of nine parts of encrypted code that are included in the three sections of the malware: .data, .adata and sync.
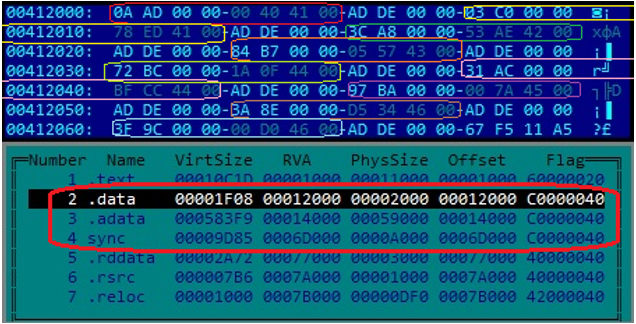
Figure 3: Size and virtual address of nine parts of encrypted code that are included in three sections of the malware.
The key for decryption is two bytes in size and is hard coded in the malware body. Decryption is accomplished by alternating the two bytes in the decryption key and subtracting them from the encrypted code:
The decrypted code then rebuilds itself by first obtaining the location of the process environment block (PEB) using the FS:[30] register. It then acquires the address of InLoadOrderModuleList (see Figure 4) in order to find the virtual address of ntdll.dll. This procedure is used to construct the required import addresses of the ZwAllocateVirtualMemory, ZwFreeVirtualMemory and LdrLoadDll APIs, which are used to load more DLLs and retrieve the required APIs from them through their API hashes.
 Figure 4: Code snippet of getting InLoadOrderModuleList.
Figure 5 shows the list of APIs gathered with their corresponding hashes.
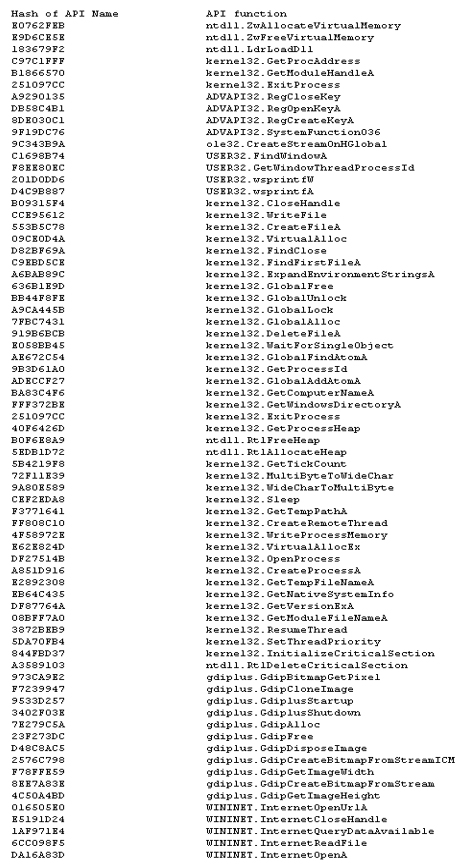 Figure 5: List of APIs gathered with their corresponding hashes.
The malware then gets the ftCreationTime.dwLowDateTime of the %USERPROFILE% folder of the infected system using the FindFirstFileA API and stores it as a variable for later use.
Next, it gets the ftCreationTime of the Windows folder using the GetWindowsDirectoryA and FindFirstFileA APIs, and tries to compare it with the hard-coded array of the Windows timestamp. If a match is found, it will not infect the system. It also tries to determine whether the system is based on Linux running a Windows compatibility layer (Wine) by checking for the existence of the following registry key:
HKEY_CURRENT_USER\Software\Wine
If this registry key exists, it will not infect the system, it will terminate and delete itself using the following command (where %% is the path and filename of the malware):
CMD /C SYSTEMINFO && SYSTEMINFO && SYSTEMINFO && SYSTEMINFO && SYSTEMINFO && DEL "%s"
It tries to get the processID of the explorer.exe process in the system by using a combination of the FindWindowA and GetWindowThreadProcessId APIs with the following parameters:
If this method fails, it will create a rundll32.exe process using the following command:
rundll32.exe shell32.dll,Control_RunDLL
It gets the processID of the newly created process using the CreateProcessA and GetProcessId APIs, then transfers its execution to the injected code in either the system's explorer.exe or the newly created rundll32.exe process using the CreateRemoteThread API and proceeds to terminate and delete itself from the system.
The malware checks whether it is already installed in the system using the following conditions:
As shown in Figure 6, the malware sends a step-by-step status update to its C&C server.
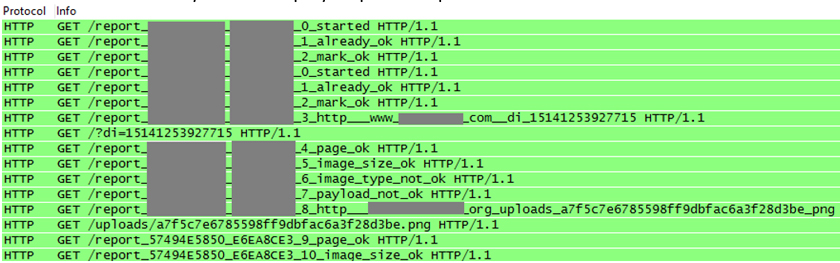 Figure 6: The malware sends a step-by-step status update to its C&C server.
It then activates InternetOpenA with the User-Agent:
Mozilla/4.0 (compatible; MSIE 8.0; Windows NT 5.1; Trident/4.0)
and InternetOpenUrlA with the following URL string structure:
http://207.36.---.49/report_[HEX1]_[HEX2]_[COUNTER]_[STATUS]
Where:
The malware then attempts to download an image file from one of the following URLs:

Figure 7: Gatak/Stegoloader's downloaded image file including hidden data.
After downloading the image file and before proceeding to the steganography algorithm to retrieve the hidden encypted data, the malware runs through the following integrity checklist:
The malware then retrieves the hidden encrypted data from the image by getting the pixel data of the image. The pixel data serves as variables in a stream generator algorithm to form the hidden encrypted data. 'Pixel data' is the colour of the pixel at position (x,y) in a bitmap object. The malware uses a combination of the GdipGetImageHeight, GdipGetImageWidth and GdipBitmapGetPixel APIs to obtain the pixel data of the image.

Figure 8: Image's hidden encrypted stream.
It decrypts the encrypted stream in the image with an RC4 algorithm and a hard-coded eight-byte key at offset 0x19 of the injected code in either explorer.exe or rundll32.exe (see below for description).

Figure 9: Start of injected code.
Next, it checks the CRC32 of the decrypted stream to verify the correctness of the resolved stream. This resolved stream is a shellcode. The shellcode contains:
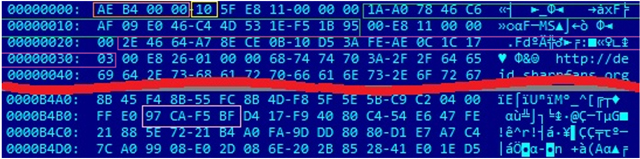
Figure 10: Image's hidden decrypted stream.
The command codes and their descriptions are as follows:
where [binary file] has the form %temp%\~XX[random_number].tmp.
The image shellcode is a backdoor that communicates with the following command and control servers:
The message sent by the image shellcode is encrypted with an RC4 algorithm prepended with a 16-byte key ID. The key ID serves as the RC4 key for the encrypted message. The structure of the decrypted message sent to the C&C server is shown in Figure 11.

Figure 11: Structure of the decrypted message sent to the C&C server.
Information greater than 1,024 bytes will be compressed with the LZMA algorithm.
The information sent to the C&C server includes sensitive information stolen from the infected system in the following format: "{"[Information Description]": "[Base64 Encoded Information]"}".
Figure 12 shows the structure of the decrypted message received from the C&C server.
![]()
Figure 12: Structure of the decrypted message received from the C&C server.
Examples of BOT commands include, but are not limited to, the following:
Gatak/Stegoloader may install other modules or malware for stealing sensitive information. Some variants have been found to install the Vundo malware family, which installs adware, ransomware and scareware. The improved digital steganography technique demonstrated by this piece of malware will surely be further adopted and/or enhanced by cybercriminals thanks to its efficiency in hiding code.
[1] https://en.wikipedia.org/w/index.php?title=Duqu&oldid=712083675.
[2] https://en.wikipedia.org/w/index.php?title=Zeus_(malware)&oldid=711753219.
[3] http://www.securityweek.com/information-stealing-malware-%E2%80%9Cstegoloader%E2%80%9D-hides-image-file.
![]()