Fortinet, France
Copyright © 2017 Virus Bulletin
In the Android security field, all reverse engineers will probably have used some of the most well-known analysis tools such as apktool, smali, baksmali, dex2jar, etc. These tools are indeed must‑haves for Android application analysis. However, there are other interesting tools and issues, which are seldom covered in conferences, and these are what this paper is about.
The paper discusses five independent points: (1) how to share a reverse engineering environment for Android application analysis, (2) how to write JEB2 scripts, (3) the status of Android debuggers, (4) how to read TLS encrypted communications, and (5) how to use Radare2 on Dalvik.
The reverse engineering of Android applications is a topic that is now widely covered on the Internet. There are several tutorials, videos and articles explaining how to do it [1, 2, 3, 4]. All of these present approximately the same steps (what is an APK, what is an Android manifest, how to unpack, reading smali, decompiling, re-assembling APKs) and use the same tools (apktool, smali/baksmali, AXMLPrinter, Java Decompiler, Androguard). As a matter of fact, this approach is perfect, the tools are very handy, and I do encourage reading those links.
Those working in the field (e.g. anti-virus analysts) also face many other advanced issues, one of which is the need to unpack or de-obfuscate advanced samples. This, too, has been covered several times by researchers [5, 6, 7, 8]. However, several other questions remain unanswered. In this paper, we tackle the following:
This paper tackles these independent issues from the angle of a mobile anti-virus analyst. However, the techniques apply to the reversing of any Android application. Each issue is discussed in its own section.
An anti-virus analyst must inspect each suspicious sample in a clean and fresh environment. Occasionally, you also need to share a sample with a co-worker to get his/her advice on a specific point. Alas, setting up a reverse engineering environment is time consuming. It is not, strictly speaking, difficult to do, but there are many different tools to install (apktool, baksmali, Java Decompiler, AXMLPrinter, Android emulator...), each with different set-up steps, and no automated procedures.
Consequently, a portable reverse engineering environment for Android applications would be most helpful. To create such an environment, some initiatives have proposed virtual machines with all the necessary tools. For example, there is the Android Reverse Engineering (ARE) VM [9] or the Androl4b VM [10]. The downside of VMs is that you must download gigabytes of information (an entire Linux host as well as Android tools), and often the environment you get is obsolete because the VM hasn't been maintained.
To deal with these issues, I propose an Android reverse engineering Docker image. Docker [11] is 'an open-source project that automates the deployment of applications inside software containers' [12]. Compared to a full VM, the download size is reduced because:
My Docker image is uploaded to the Docker Hub and can be downloaded directly using the Docker command docker pull. Precisely, the steps to use my environment are:
docker pull cryptax/android-re
docker run -d options cryptax/android-re
You immediately get an apparently separate Linux host which you can SSH into or use VNC (desktop sharing) and get access to Android reversing tools and emulators.
The use of a Docker image also improves the maintenance issue. Indeed, a Docker image is built from a Dockerfile, which is like a 'source script' to create the image. For instance, the Dockerfile specifies each package to install and the commands necessary for the set-up of the container. This Dockerfile is shared at [14] and you can freely customize it to your own needs, or update it to this or that newer version.
In this subsection, I share a few tricks I used to set up the Dockerfile for my Docker image.
Docker is particularly well suited to creating compartments containing daemons, services, web servers, etc. Surprisingly, support for graphical applications isn't straightforward, and there are many questions and blog posts on that [15]. Basically, the Docker container is seen as a remote Unix host, and there are three alternatives (see Table 1):
docker run -d -e DISPLAY=$DISPLAY -v
/tmp/.X11-unix:/tmp/.X11-unix
OTHER-OPTIONS --name mycontainer
cryptax/android-re
Xvfb :1 +extension GLX +render -noreset
-screen 0 1280x1024x24&
DISPLAY=:1 /usr/bin/xfce4-session
>> /root/xsession.log 2>&1 &
| Solution | Pros | cons |
| Share display | Lightweight | Only works with hosts that support X11 (and sometimes bugs) |
| SSH X forwarding | Lightweight | Won't work on Windows, bug on Mac |
| VNC viewer | Need to install vncviewer | Screen resolution set by the container. Container windows appear inside the VNC viewer window. Container needs to contain a window manager and X11 server. |
Table 1: Pros and cons of solutions for running GUI apps in Docker.
So, if we want to be flexible, our Docker image is going to need (1) an SSH server and (2) a VNC server in the container. Normally, a server is started in the Dockerfile via a CMD. For example:
CMD ["/usr/sbin/sshd", "-D"]
If we specify another CMD for VNC, we are in for a surprise: Dockerfiles do not support multiple CMDs. The last CMD supersedes all previous ones. The recommended solution is to use supervisor [16], a process control system.
In our case, we configure supervisor to start both SSH and VNC, and run supervisord. In Listing 1, lines 4 and 5 configure the SSH server. Lines 6 and 7 launch a personal script, startXvfb.sh, which starts both Xvfb and the VNC server.
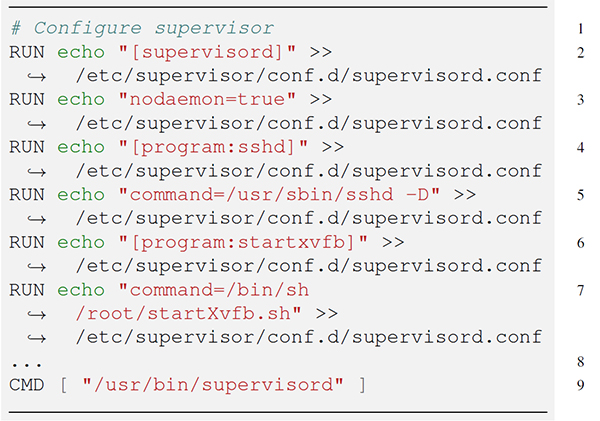 Listing 1: Configuration of supervisor in a Dockerfile.
The password for logging into the VNC server is hard coded in the Dockerfile (see Listing 2).
ENV VNC_PASSWORD "rootpass"
RUN x11vnc -storepasswd $VNC_PASSWORD
![]()
˜/.vnc/passwd
Listing 2: Specifying a hard-coded password to VNC in the Dockerfile (use with care).
The SSH password is hard coded, too. As we wanted a simple environment, there is only one user, root. So root needs to be able to SSH. This is not possible by default; the SSH server configuration needs to be modified to authorize root login (see Listing 3).
RUN echo "root:$SSH_PASSWORD" | chpasswd
RUN sed -i 's/PermitRootLogin
![]()
prohibit-password/PermitRootLogin
![]()
yes/' /etc/ssh/sshd_config
RUN sed 's@session\s*required\s*pam_loginui ┘
![]()
d.so@session optional
![]()
pam_loginuid.so@g' -i /etc/pam.d/sshd
Listing 3: Allowing root login in the Dockerfile (use with care).
Note that this is something you might want to change for your own environment. The use of hard-coded passwords also means that the Docker container should not be made available publicly on the web.
An important step in the Dockerfile is the installation of an Android emulator. Normally, Android emulators are installed using a graphical tool, named android. Actually, android also works in the command line and can therefore be used in a Dockerfile. The steps are:
RUN wget -q -O "/opt/tools-linux.zip"
https://dl.google.com/android/rep ┘
ository/...
RUN unzip /opt/tools-linux.zip ...
...
ENV PATH $PATH:/opt:...
RUN echo y | android update sdk
--filter tools --no-ui --force -a
RUN echo y | android update sdk
--filter platform-tools --no-uiAs the command line android asks for user confirmation, echo y is needed to run the command in the background with user input.
--force -a
RUN echo n | android create avd
--force --name AVDNAME --target
ANDROID-VERSION --abi
"default/armeabi-v7a"
Finally, disk space should be taken into account. If we configure numerous packages in the Dockerfile, the container will be huge, and we will gain little compared to using a VM. The Dockerfile needs to be set up only with what is used (you can customize mine to remove what you don't need). Additionally, it is good to clean up package caches. There are several best practices on the web explaining how to optimize one's Dockerfile [17].
JEB is a graphical Android application decompiler, commercialized by PNF Software, and quite often used by people in the field. Similarly to IDA Pro, reverse engineering tasks can be scripted, since version 2.0.14 (JEB2), by Python code. It is particularly interesting to automate repeatable tedious tasks that must be performed for a given analysis. PNF Software provides documentation [18] and blog posts [19] to help write your first scripts, but the examples are too simple (print hello world) to assist the reverse engineer in real tasks.
This section explains how to implement a string de-obfuscator – a common requirement when reversing malicious samples – as a JEB2 script, taking as example a sample of Android/Ztorg (sha256: 2c546ad7f102f2f345f30f556b8d8162bd365a7f1a52967fce906d46a2b0dac4).
The first preliminary step is installation. Not always so clear in the documentation, this is fortunately easy: first install Jython (Python for Java platforms), then put your script in the ./JEB-HOME/scripts directory. Also, make sure to bookmark the API reference [20], as this is a must-have for script development.
We notice that the Ztorg sample uses string obfuscation. The obfuscated strings are loaded as a byte array (with no apparent meaning) and decoded by a routine – specifically in this case by method a() of class c in package a.b (the sample also obfuscates names, as you can see) – see Figure 1. The decoding routine has been reversed at [21].
 Figure 1: Android/Ztorg sample with the original obfuscated strings.
We want to find all classes that initialize such obfuscated strings and automatically de-obfuscate them. The result is displayed in Figure 2.
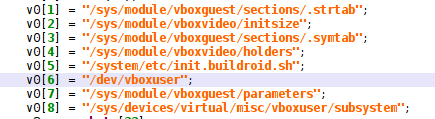 Figure 2: JEB2 script has de-obfuscated the strings.
We mentioned that the official documentation is too basic, nevertheless PNF Software provides several sample scripts on GitHub [22]. The closest to our needs is named JEB2JavaASTDecryptStrings.py and serves as a base for our script.
My script is available at [23].
Basically, we keep the beginning of the example: imports, initialization of back-end engine, open first project and enumerate decompiled classes (see Listing 4). There are very few variations from the original script (class renaming, a few unnecessary lines removed) until that point (line 45 of JEB2JavaASTDecryptStrings.py – which corresponds to line 35 of my own script).
self.units = RuntimeProjectUtil.findUnitsBy ┘
![]()
Type(prj, IJavaSourceUnit,
![]()
False)
Listing 4: Enumerating decompiled classes of a given project.
In the Ztorg sample, we notice that the strings to decompile are always located in static class constructors (see Listing 5).
static {
b.a = c.a(new byte[]{15, 116, 8});
b.b = c.a(new byte[]{110, 114, 105, 111});
b.c = c.a(new byte[]{105, 4, 25, 8, 21,
,! 107, 8});
b.d = c.a(new byte[]{85, 29, 66});
}
Listing 5: In Android/Ztorg, string de-obfuscation occurs in static constructors.
So, the first step is to locate the static constructor:
javaClass = unit.getClassElement()In the API, this returns an object of type IJavaClass (see getClassElement in IJavaSourceUnit in the API).
if m.getName() == '<clinit>'
Then, we need to find all lines in the static constructor which involve a call to the de-obfuscation routine. In JEB2, lines are more precisely statements. We parse the method's statements:
for statement in m.getBody():
There are several types of statements: function calls, assignments, conditions, returns etc. In our sample, obfuscated strings appear in assignments. So, we filter assignment statements:
if statement.getElementType() ==
![]()
JavaElementType.Assignment:
This is where it gets a bit tricky. The obfuscated strings appear in:
v = c.a(....)The right side of the assignment, which we retrieve with a call such as statement.getRight(), is the call to the de-obfuscation routine. That's what we need to modify to
v = ''de-obfuscated''
v = new String(c.a(....))
v = new String(''de-obfuscated'')
So, to check if a statement calls the de-obfuscation routine, we must:
getMethod().getSignature()
for rightsub in statement.getRight().ge ┘
![]()
tSubElements():
When we have found such a statement, we need to de‑obfuscate. This is the point at which we call our de‑obfuscation method.
Finally, we could just print the result in the console, but even nicer, we want the de-obfuscated string to replace the part with c.a(...). This is done by a call to replaceSubElement() at line 90 of Listing 6, where:
The new de-obfuscated string is created with self.cstbuilder.createString() (line 90) and the JEB2 window is updated by notifying it (unit.notifyListeners() - line 91).
90 father.replaceSubElement(elem,
![]()
self.cstbuilder.createString(''.join(m ┘
![]()
ap(chr,decbytes))))
91 unit.notifyListeners(JebEvent(J.UnitChange))
Listing 6: Replacing the obfuscated string with the decoded one.
Android sample debugging is a dream for many reverse engineers. Especially on complicated samples, it is very handy to put a breakpoint on a critical line, run the code step by step, inspect (or even modify) variables and stack. As far as I know, there are two tools that allow this to be done at Dalvik level: JEB2 (that we mentioned in Section 3) and CodeInspect [24].
I tried both JEB2 version 2.2.11 (the latest version at the time of writing this paper) and CodeInspect (licensed demo of Oct 2016). The results are promising for the future, but not yet mature.
The main issue I faced with CodeInspect was its weight. It took me close to three minutes to open a debugger session. Nevertheless, if you are patient enough, it works well, and I successfully debugged an instance of Riskware/InnerSnail!Android (sha256: c5c11408483eb87781af30280b2878890f5741fe63d569ae9
e3689c1e550eaa4 - see Figure 3).
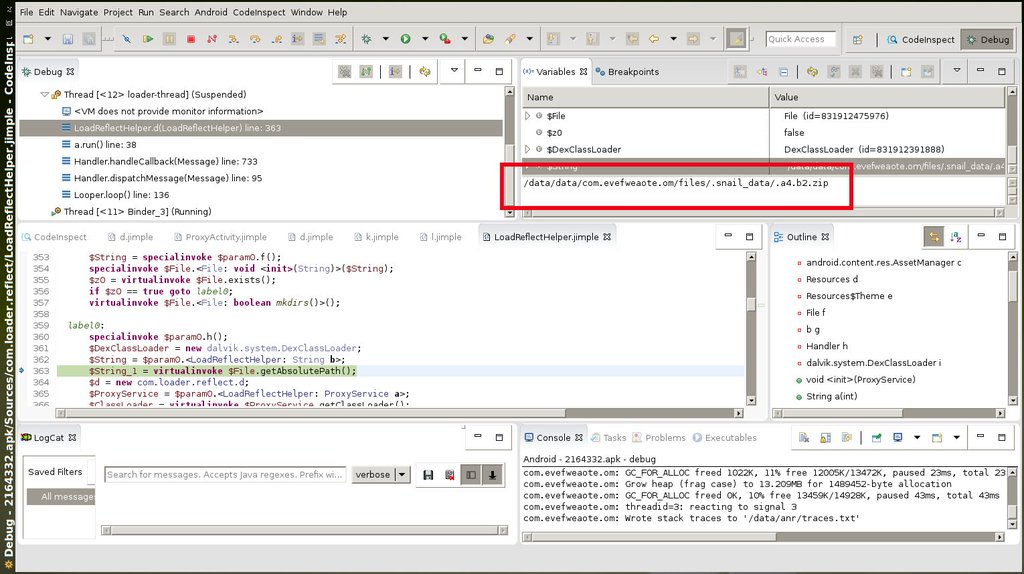 Figure 3: A debug session with CodeInspect, where we inspect the content of a variable.
That sample uses the DexClassLoader class to load a Dalvik executable file. The file is passed as an argument in the class constructor, but with static analysis I couldn't find out its value. So I opened the project in CodeInspect. The Dalvik bytecode is converted to Jimple, which is an intermediate representation of Java. It is different from smali, but easy to follow. I set a breakpoint on the corresponding line, opened a debugger session and attached it to an existing emulator (alternatively, CodeInspect can launch another one). It installed the sample on the emulator, ran to the breakpoint and read the value of the variable (a hidden zip filename).
With JEB2, the steps are essentially the same, except the JEB2 GUI does not install and run the application – you need to do it. To start the application:
am start -D -S -n PACKAGENAME/ACTIVITYNAME
where package name is something like com.mx.cool.videoplayer, and activity name is a relative path to the package name, e.g. .activity.MainActivity (don't forget the initial dot).
I tried it over two different samples: Android/Crosate.A!tr (sha256: 15281dbe2603f5973d53c5fddabbcc3de6ad3ec65146aa2ffb34a779ea604f82) and the Ztorg of Section 3. Unfortunately, I encountered numerous bugs and crashes (which I reported to the developers) with the current version of JEB2 and had difficulties completing the work.
Hopefully, the situation will improve both for CodeInspect and JEB2 in the next few months. Note that running a debugger session obviously runs the sample, so beware not to set the breakpoint too far, after critical malicious activities. Also, if you modify the code, it recompiles a new application, which might raise ethical issues in the case of malware analysis because it then virtually creates a new malicious sample.
Good news: more and more Android applications use TLS to communicate with a remote server. However, for the reverse engineer, especially the anti-virus analyst, this presents another problem, because the communication flow is now encrypted and thus not understandable. How can we decrypt the flow?
The solution is Man-in-the-Middle (MitM), where a host we own is configured to impersonate the server for the client and, reciprocally, the client for the server. When the client communicates with the server, the idea is that the MitM host intercepts the request and provides a certificate of its own instead, claiming it is the server. The client is fooled and consequently encrypts messages for the MitM host, not for the server. Server responses to the client are handled in the same way, with the MitM host claiming it is the client this time.
Mitmproxy is able to do this automatically. This tool runs on the MitM host. It generates certificates automatically on the fly for each communication to a TLS server, and decrypts and displays packets that flow through it (packet modification is even possible).
Figure 4 explains the architecture of our reverse engineering lab. The Android smartphone and the MitM host are on the same (Wi-Fi) network.
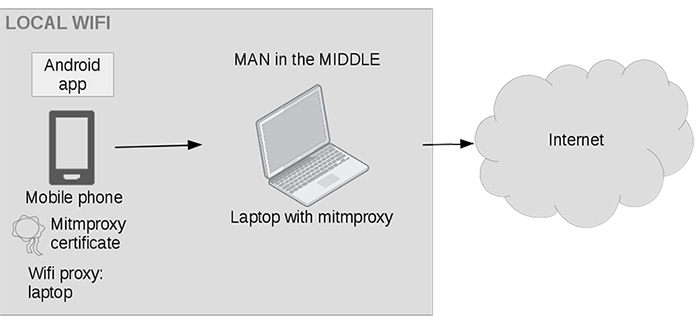 Figure 4: Set-up to perform MitM of Android application communications.
To intercept network packets, we modify the configuration of the smartphone's Wi-Fi connection to use a proxy: specify the IP address of the MitM host, and default port 8080 (there are other possibilities, but this is the easiest - see [25]). Thus, all packets of the smartphone go to the MitM host.
To impersonate the real server, the MitM host generates a (fake) server certificate, signed by its own CA. As this CA is not known by the smartphone, it must be added to the smartphone's SD card:
push /.mitmproxy/mitmproxy-ca-cert.cer
Then, on the smartphone, install the certificate: Settings -> Security -> Install from SD Card, and select the certificate.
The set-up is complete. Launch mitmproxy to start eavesdropping on communications between the smartphone and remote TLS servers.
For example, I performed such a MitM on a genuine Android application to control a smart toothbrush (Figure 5). The communication with the remote server, https://app.beam.dental, is over HTTPS and would appear encrypted in a standard network capture. With mitmproxy, we are able to decrypt any packet and inspect its content.
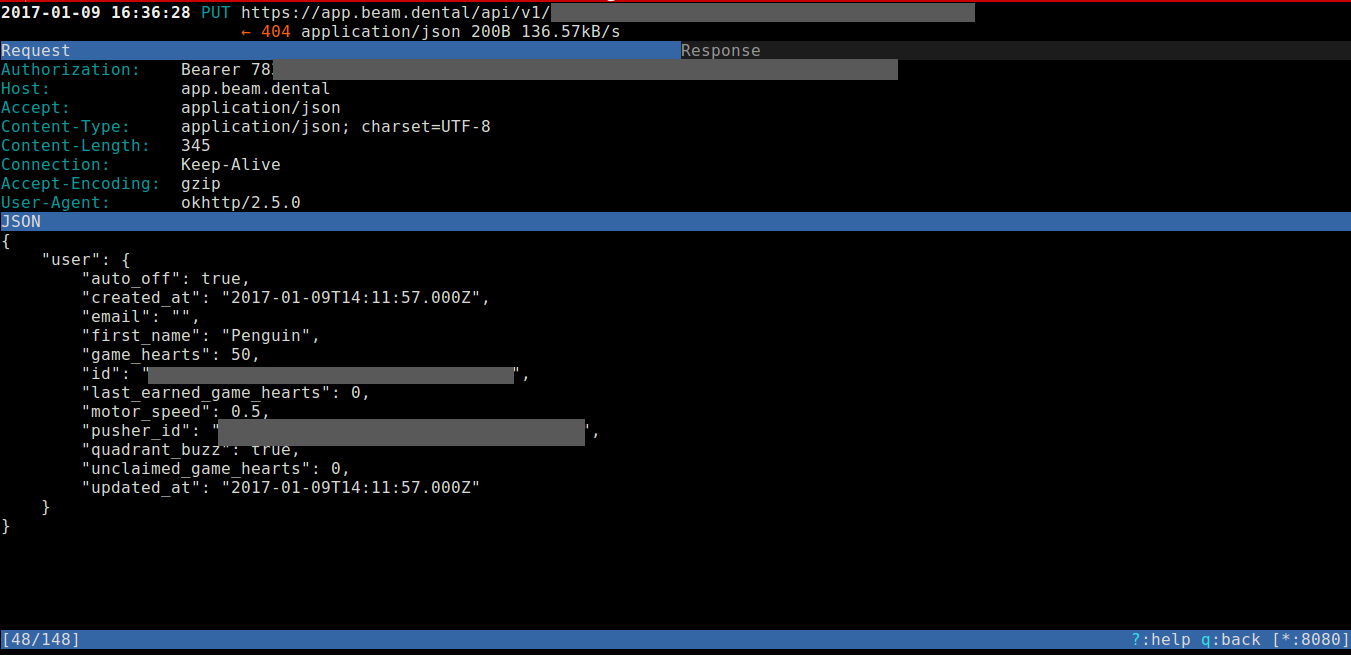 Figure 5: Mitmproxy in action, showing clear text content for an HTTPS conversation.
Note that there is a limitation: MitM won't work for Android applications that use certificate pinning. However, so far, such applications are quite rare.
Radare2 is a 'framework for reverse engineering and analysing binaries' [26]. It is open source and well known in the geek community for its command-line interactive shell and for its wide support of many architectures including lesser used ones.
This section provides tips and tricks, but also feedback, on using Radare2 to analyse Android malware.
Although Radare2 is not the obvious immediate choice for reverse engineering Android applications (people in the field usually prefer combinations of apktool, baksmali, JD, JEB etc.), it has recently added support for Dalvik executables (actually, support for Dalvik dates back at least to 2015, but in my humble opinion, it has only been usable since the end of 2016) and may be an interesting choice for occasional reverse engineers or Radare2 fans.
Radare2 does not have any particular knowledge of what APKs, Android manifests or resources are. It is really only meant to be run on Dalvik executables (.dex). It produces Dalvik bytecode (see Figure 6). There is no decompiler.
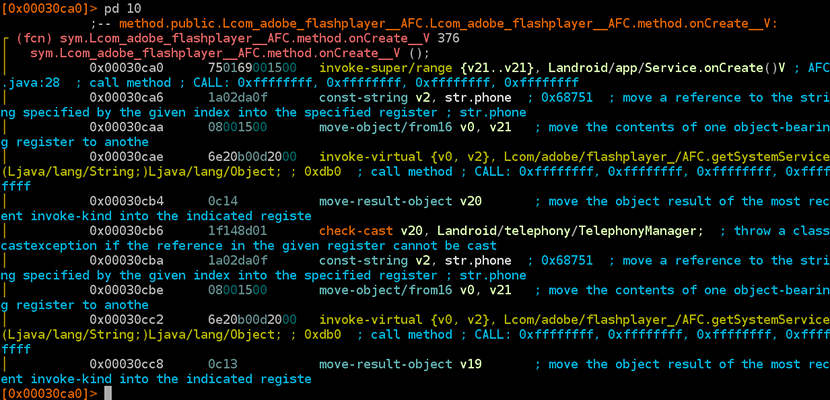 Figure 6: Android/Crosate disassembled by Radare2.
The disassembler is reasonably good, with occasional bugs. For instance, in April, I reported a bug in the disassembly of array-data payloads [27]. This was solved a few days later.
There are several tutorials on how to use Radare2 (see [28, 29, 30, 31], for instance). In this subsection, we focus only on the specificities with dealing with Dalvik executables.
First, we start by launching Radare2 on a DEX:
r2 -e asm.payloads=true classes.dex
Then, we need to analyse all flags with command aa. Unfortunately, this step is currently very long on some samples (up to 10 minutes in some cases!).
The following commands are the most useful for DEX:
0x00064fef 49 str.http:__verisign_contr ┘
![]()
olcenter.com_teapot_gate.php
[0x0001f424]> s 0x00036b30
or
[0x0001f424]> sf sym.Lcom_adobe_flashplayer ┘
![]()
__UC.method._init___V
[0x00036b30]> pd 10
...
[0x00036b30]> axf sym.Lcom_adobe_flashplaye ┘
![]()
r__UC.method._init___V
C 0x36b30 invoke-direct {v0},
![]()
Ljava/lang/Object.<init>()V ; 0xede
Listing 7: Seeking, disassembling and finding cross references in DEX with Radare2.
Because of its command-line nature, Radare2 is particularly well suited to scripting. For instance, from the Radare2 prompt, it is possible to invoke a Python r2 script using the following special construction:
#!pipe python ...
The script itself must import r2pipe bindings [32]:
import r2pipe
and you can automate two commands:
r2p=r2pipe.open()
r2p.cmd(your r2 command)
I have written a Radare2 script to de-obfuscate strings of an Android/Ztorg sample. The script is available at [33]. It has two arguments: the address of the obfuscated string and its length. It:
As far as I know, this is the most advanced usage of Radare2 on Android malware.
This subsection presents my own personal impressions of Radare2.
I have used Radare2 on both simple and complex samples: it works.
Nevertheless, there are a few limitations, in my opinion. I have already mentioned the time taken to run aa and renaming local variables, but in addition:
Also, when working with Radare2, I would recommend using a large screen: lines are often quite long. A visual mode exists where each text blog is organized graphically, but I am not enthusiastic. (I fail to understand why one would use Radare2 for GUI when JD, JEB2 and IDA Pro are available for those who like a GUI – but this is a personal view.)
To summarize, I would say that I like Radare2 because it is command-line based, close to code, and scriptable. But I find it difficult to get an overview of a sample and parse it. I would definitely recommend the use of Radare2 for Android samples for any Radare2 fan. It works well. However, if you are a newbie, the entry ticket might be too high. If you are looking for a reverse engineering shell for Android, I'd rather recommend Androguard. And if you like GUIs, Radare2 is certainly not the option, you should stick to JD or JEB.
The following are the take-aways for this paper:
[1] Oliva Fora, P. Beginners Guide to Reverse Engineering Android Apps. In RSA Conference, February 2014. https://www.rsaconference.com/writable/presentations/file_upload/stu-w02b-beginners-guide-to-reverseengineering-android-apps.pdf.
[2] Altomare, D. Android Reverse Engineering 101. Parts 1 to 5. November 2015. http://www.fasteque.com/androidreverse-engineering-101-part-1/.
[3] Desnos, A.; Gueguen, G. Android: From Reversing to Decompilation. In BlackHat Abu Dhabi, 2011. https://media.blackhat.com/bh-ad-11/Desnos/bh-ad-11-DesnosGueguen-Andriod-Reversing_to_Decompilation_WP.pdf.
[4] Margaritelli, S. Android Applications Reversing 101. April 2017. https://www.evilsocket.net/2017/04/27/Android-Applications-Reversing-101/.
[5] Strazzere, T.; Sawyer, J. Android hacker protection level 0. In DEFCON 22, August 2014.
[6] Apvrille, A.; Nigam, R. Obfuscation in Android malware and how to fight back. In 8th International CARO Workshop, May 2014.
[7] Lipovsky, R. Obfuzzcation issues. In 8th International CARO Workshop, May 2014.
[8] Yu, R. Android packers: facing the challenges, building solutions. In Virus Bulletin International Conference, 2014. https://www.virusbulletin.com/virusbulletin/2016/01/paper-android-packers-facing-challenges-building-solutions/.
[9] http://redmine.honeynet.org/projects/are/wiki.
[10] https://github.com/sh4hin/Androl4b.
[11] https://www.docker.com/.
[12] Wikipedia. https://en.wikipedia.org/wiki/Docker_(software).
[13] Coleman, M. Containers are not VMs. March 2016. https://blog.docker.com/2016/03/containers-are-not-vms/.
[14] Dockerfile. https://github.com/cryptax/androidre.
[15] Rehm, F. Running GUI apps with Docker. September 2014. http://fabiorehm.com/blog/2014/09/11/running-gui-apps-withdocker/.
[16] Krijger, Q. Using supervisor with Docker to manage processes (supporting image inheritance). March 2014. http://blog.trifork.com/2014/03/11/using-supervisor-with-docker-tomanage-processes-supporting-imageinheritance/.
[17] Best practices for writing Dockerfiles. https://docs.docker.com/engine/userguide/eng-image/dockerfile_bestpractices/.
[18] PNF Software. Writing client scripts. https://www.pnfsoftware.com/jeb2/manual/dev/writing-client-scripts/.
[19] Falliere, N. Writing JEB2 scripts in Python. November 2015. https://www.pnfsoftware.com/blog/writingjeb2-scripts-in-python/.
[20] PNF Software. JEB API documentation. https://www.pnfsoftware.com/jeb2/apidoc/reference/packages.html.
[21] Apvrille, A. Teardown of a recent variant of Android/Ztorg – Part 1 and 2. March 2017. http://blog.fortinet.com/2017/03/15/teardown-of-a-recentvariant-of-android-ztorg-part-1 and http://blog.fortinet.com/2017/03/15/teardown-of-android-ztorg-part-2.
[22] https://github.com/pnfsoftware/jeb2-samplecode/tree/master/scripts.
[23] https://github.com/cryptax/misccode/blob/master/DeobfuscateZtorg.py.
[24] https://codeinspect.sit.fraunhofer.de/.
[25] http://docs.mitmproxy.org/en/stable/howmitmproxy.html.
[26] Wikipedia. https://en.wikipedia.org/wiki/Radare2.
[27] https://github.com/radare/radare2/issues/7376.
[28] Techorganic. Radare2 in 0x1e minutes. March 2016. https://blog.techorganic.com/2016/03/08/radare-2-in-0x1e-minutes/.
[29] A journey into Radare2 part 1. March 2017 https://www.megabeets.net/a-journeyinto-radare-2-part-1/.
[30] http://radare.tv.
[31] http://www.radare.org/r/talks.html.
[32] Pancake. Scripting r2 with pipes, May 2015. https://medium.com/@trufae/scripting-r2-with-pipes-47a7e14c50aa.
[33] https://github.com/cryptax/misccode/blob/master/r2ztorg.py.
![]()