2015-01-06
Abstract
The very nature of rootkits makes them hard to classify (and in some cases even detect) using automated malware analysis techniques. Kernel memory modifications can indicate that samples are trying to conceal information or hijack execution paths, thus exhibiting malicious behaviour. In an environment with a large throughput of analysis jobs, the need arises for an efficient and accurate way to identify such complex threats. In their VB2014 paper, Ahmed Zaki and Benjamin Humphrey present a system for identifying rootkit samples that is based on automated analysis - but instead of monitoring modifications to the whole memory, the system captures changes to data structures and memory regions that are known to have been targeted by rootkits in the past.
Copyright © 2014 Virus Bulletin
As an increasing number of automated malware analysis systems become mainstream, the emphasis on the relevance of the data extracted from the analysis task increases. Conceptually, automated malware analysis systems provide information about a sample and also identify modifications to a computer system induced by the sample. Traditionally, the focus of such analysis systems has primarily been on monitoring process, disk and network-level behaviour with varying levels of granularity. While providing a varied set of information, these systems offer limited ability to identify and classify rootkits. The very nature of rootkits makes them hard to classify (and in some cases even detect) using these scanning techniques. Kernel memory modifications can indicate that samples are trying to conceal information or hijack execution paths, thus exhibiting malicious behaviour. In an environment with a large throughput of analysis jobs, the need arises for an efficient and accurate way to identify such complex threats that could otherwise be misclassified or pass unnoticed. We present a system for identifying rootkit samples that is based on automated analysis. In this system we recognize the performance and memory constraints of a high-throughput environment; instead of monitoring modifications to the whole memory, we capture changes to data structures and memory regions that, on a Microsoft Windows operating system, are known to have been targeted by rootkits in the past. We explain the reasons behind the design decisions and how they have reflected on identifying different classes of rootkits. In our research, we also explore the effectiveness of using this model as a standalone component to identify malicious behaviour. In order to do this, we run a large set of known clean versus malicious files to identify traits that could be indicative of malicious activity.
The volume of malware is increasing exponentially. The number of samples seen by anti-virus vendors each day now exceeds the personnel resources available to analyse and classify them. In order to reduce the workload, automated analysis systems are used to identify, classify and cluster samples based on their malicious behaviour. Using static (examining file attributes) and dynamic (behavioural) techniques, these systems examine each sample, and usually make a reasoned assumption about its maliciousness.
Kernel-mode rootkits pose a particular problem when it comes to automated analysis. A rootkit is ‘malicious software that allows an unauthorized user to maintain access to a computer by concealing programs and processes, files, or data from the operating system’ [1]. Kernel-mode rootkits are a sub-class of rootkits that introduce changes in the kernel memory of an operating system to conceal or manipulate information provided by the kernel itself. Examples of kernel-mode rootkits include Necurs 2, TDL [3] and Turla [4]. A rootkit’s ability to hide in the operating system increases the likelihood that automated analysis systems will fail to produce any intelligible data. Tools such as GMER [5] can be used to detect rootkit activity, but scan times can be long and the tools can be cumbersome to automate. In an environment where the throughput of samples is in the tens of thousands, speed of analysis is certainly an issue.
To create an automated analysis system that can detect kernel mode rootkits, it is necessary to create a reliable method of identifying rootkit-like behaviour that is efficient and fast to keep analysis times to a minimum. We propose a system that fulfils these criteria, based on the Cuckoo Sandbox [6] modified to use the Sophos AV engine. Using the engine, selected areas of the kernel are extracted and saved to create ‘Before’ and ‘After’ snapshots to identify the changes made to the kernel. By examining these changes it is possible to identify rootkit activity.
We use a Windows 7 SP1 x86 virtual machine in a VirtualBox virtualization environment, version 4.3.10. The kernel memory differencing is implemented as part of a Cuckoo Sandbox installed on Ubuntu OS version 12.04.
The guest virtual machine has the Sophos anti-virus engine installed by default. Detections are reported as part of the analysis information and sent to the host component. Once a sample executes, a kernel memory scan is started by the analyser inside the guest machine. In addition to scanning for known malware traits in kernel memory, the scan dumps specific kernel structure information to disk in JSON format. (More on this data is explained in Section 2.1.) This data is saved to the server module with other standard behavioural analysis information as part of each analysis.
In order to capture kernel memory changes made by the sample, we need a baseline snapshot of the kernel data before execution of the sample (the baseline data). The baseline data is associated with a virtual machine snapshot. Each snapshot has a unique identifier and baseline data. The baseline data is generated by performing a dummy analysis with no files submitted. The results of the analysis are tagged as baseline data, and comparisons are made with data obtained from subsequent analysis tasks.
Cuckoo
We utilize the Cuckoo Sandbox as a base framework for automating sample analysis. Cuckoo Sandbox is an open-source malware analysis system [6]. It supports running different types of files using different virtualization technologies.
Cuckoo Sandbox’s modularity makes it ideal for our purposes. It can be split into a host-side management component and a guest side component running in a virtual machine (VM). The host-side component is responsible for the core execution of the analysis task: starting a VM, preparing an analysis task for execution (packaging the guest-side components that run inside the VM to collect analysis information), collecting the raw data resulting from the analysis, processing it, and finally running a set of signatures and reports to present the results. The guest side component runs selected modules packaged by the host-side component and returns the results to it [6].
Cluster requirements
In building an efficient automated analysis system capable of processing high sample volumes, both time and stability are key requirements. We did not want the time taken to complete a job to extend beyond four minutes. This time interval captures the total time from the sample submission to the report generation. By adhering to this requirement we could be confident that our system would work efficiently in a cluster environment.
We can split the overall task into three main time frames:
Preparation and initialization – starting the VM and sending the sample to the VM for execution and analysis.
Analysis – running the sample in the VM, returning the raw data for processing, and powering off the VM.
Processing and reporting – kernel memory data differencing and executing the signatures against the processed results.
Using generic anti-rootkit tools inside the VM was not feasible due to the time it takes to complete a scan (minutes with some tools), the inconsistent formats of the log files produced by the various scanners, and the footprint some of them have on the kernel memory, which taints the collected information. A tool like GMER [5], for example, could take more than two minutes to perform an exhaustive scan.
We measured the time taken for the kernel memory data to be produced with our additions, and it added 10–15 seconds to the standard analysis time. The default time taken from the point the VM stops until the report is produced can be between 20 and 80 seconds. The time is dependent on the amount of processing performed on the raw results retrieved from the job, the number and performance of the signatures that are run on the results, and the type of report to be produced. On evaluating our signatures and the differencing mechanism, we found that the added time is between one and two seconds.
Given the minimal amount of time added, we decided to maximize utility. We used a default analysis timeout of 120 seconds and set our kernel memory scan to start after 105 seconds. By using those intervals we allowed more time for the sample to run and make changes to kernel memory and disk so that the changes would be picked up during the scan. We are aware that this setting could be costly in a cluster environment, since many samples do not execute in automated systems and thus we would be wasting the 120 seconds. The timeout and scan start settings can be altered to reduce the delay before the scan. The benefit for us was that the feature did not add a significant time delay in producing the necessary information.
The overall analysis task time from sample submission to report generation using VirtualBox on a standalone machine took between three and four minutes. This included the initialization, analysis and reporting time. This length of time is acceptable in a cluster environment.
The requirements for the kernel examination component of this system are:
A presence in the kernel.
The ability to dump areas of kernel memory selected at runtime.
The ability to write dumped memory to a JSON file.
The decision to use the Sophos AV engine to gather the required data was based on it meeting the above requirements. The Sophos AV engine is already capable of dumping and scanning kernel memory, negating the need to design and implement new software to do so. Since we were already using the Sophos AV engine to scan for malicious traits during analysis, we decided to leverage its presence to gather the desired information.
To select which areas of the kernel to examine, it is necessary to understand what effect kernel-mode rootkits have on the kernel. For a kernel-mode rootkit to have a presence in the kernel it must load a driver. The driver will then modify various functions or pointers to hide malicious activity from the user, other programs, and sometimes from itself.
A driver object represents an individual driver in the system [7]. The DRIVER_OBJECT structure contains information about a driver including its name, initialization routine, unload routine, a pointer to the loaded driver image, a pointer to its device object, and its MajorFunction dispatch table.
When a rootkit loads its driver, a DRIVER_OBJECT structure is created for it. The DriverStart field points to the loaded image of the rootkit driver. When the initialization routine is executed, as well as creating its own driver object, a rootkit driver can modify the driver objects of other drivers.
To track changes, driver objects and device objects are enumerated, and data from each is extracted and dumped. For speed and memory efficiency, only specific fields from the structures are dumped.
A kernel module is a loaded image file that resides in kernel address space. The address space typically comprises drivers and the Windows kernel. Currently, the information dumped to the JSON file is minimal, consisting of the module name, image base and module size. By comparing before and after snapshots of the module list, it is possible to tell which modules have been added (indicating the possible presence of a new driver), and which modules have been changed. Changes to the image base or size of a module suggest that the module has been replaced, thus indicating the presence of a rootkit.
The System Service Dispatch Table (SSDT) is an array of function pointers that resides in kernel address space. The entries in the array reference core functions exported by the Windows kernel (e.g. ntoskrnl). These functions provide an interface for user-mode programs to perform tasks such as opening a file or querying a directory. By modifying the address of a function pointer or the code that an entry points to, rootkits can hook a function and control the data that is passed to and from it.
To detect changes to the SSDT, the entire table is dumped. The addresses in the table are checked (during processing) against the ones saved in the baseline snapshot to detect any hooks. Typically, when the code of a function is hooked, an assembly language ‘jmp’ instruction is written to the beginning of the function which jumps to hook the code. To detect such code hooks, the first eight bytes of each function are also dumped, to enable the processing module to compare them against the baseline snapshot.
The IDT is a processor-specific array that has 256 entries. Each entry (an interrupt vector) in the array contains information about its corresponding interrupt handler. Interrupts are operating system conditions that divert the processor to code from the normal flow of execution of a program [8]. These interrupts are called (using the INT x assembly language instruction) by both hardware and software. As defined by Intel, the first 32 entries are reserved for exceptions [8] (i.e. INT 0 - Division by 0), and the rest are ‘user’ defined. The Windows operating system and various core system drivers also install interrupts, but there remain spare entries that rootkit developers can use to their advantage.
The entire IDT for each processor is dumped to the JSON log to enable us to find new IDT additions and hooks.
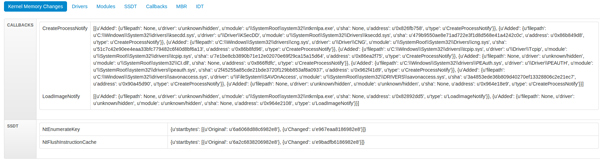
A callback is a function that is executed on completion of a specific event. The Windows operating system provides routines that allow driver writers to register callbacks on a number of events that rootkit writers can exploit. The routines that are of most interest are:
CreateProcessNotify – triggered when a new process is created
LoadImageNotify – triggered when a new image is loaded
CreateThreadNotify – triggered when a new thread is created
CmRegister – triggered when an operation is performed on the registry.
A rootkit registering any of these callbacks will be able to hide processes, images, threads or registry entries upon creation.
The callbacks of each type are enumerated and added to the JSON log.
Rootkits reside in kernel address space, but bootkits begin outside the operating system. Their execution begins in either a modified Master Boot Record (MBR) or a modified Volume Boot Record (VBR). A common task of a bootkit is to load a driver, typically from hidden storage at the end of the disk, which may proceed to hide the modified MBR/VBR. As the bootkit executes before the operating system is fully started, it can bypass detection by security software.
To detect the presence of a bootkit, checksums of the MBR and VBRs for all partitions are written to the JSON log. In addition to the initial boot code, the MBR also contains the disk’s partition table [9]. The entire partition table is also dumped and written to the JSON log so that changes in partition location/size (also indicative of a hidden file system) can be detected.
Cuckoo’s processing modules are Python scripts that analyse the raw data from the guest-side component of the sandbox and append the result to a global data structure [6]. To identify changes in the kernel data we had to add a custom processing module that would compare the data received from the analysis to the baseline data associated with the guest machine. Since new analysis tasks are started from the same snapshot, we do not encounter noise caused by ASLR in kernel memory space.
After differencing both data structures and identifying any new changes, the processing module produces two dictionary objects. One object encompasses all the changes identified (the diff object), while the second object includes all the information retrieved from the analysis task (the task object). Both objects are then appended to the global container which holds information produced by other processing modules. The task object will include information about driver objects, modules, kernel callbacks, the system service dispatch table, the interrupt descriptor table and hashing of the master boot record, along with information about each partition defined in the partition table.
The diff object will show whether information has been changed, added or deleted. The comparison mechanism is agnostic to the number or name of the data; it assumes both objects are JSON formatted. Post comparison, noise is cancelled from the diff object. We identified noise heuristically and used a list approach to identify driver objects and modules that we do not include in the diff output. We decided to exclude noise coming from the following modules, since it was almost always due to paging in:
\windows\system32\autochk.exe
\systemroot\system32\drivers\kmixer.sys
\systemroot\system32\drivers\spsys.sys
\systemroot\system32\drivers\asyncmac.sys
\windows\system32\devobj.dll
\windows\system32\setupapi.dll
Some drivers will experience the creation of devices once the execution starts, while others will change DEVICE_OBJECT addresses. The device object attached to \Driver\usbhub named ‘\Device\_HID00000000’ gets a different address each time the job starts. The same problem occurs for \Driver\mouclass, which is the class driver for all mouse devices. Namely, a ‘\Device\PointerClass’ DEVICE_OBJECT gets a different address. This different DEVICE_OBJECT gets attached to the list of devices of \Driver\mouhid and \Driver\hidusb.
We also found less common cases of \Driver\swenum and \Driver\asyncmac having devices attached to them, so we also filtered noise coming from them.
The drivers from which noise was filtered were:
\Driver\mouhid
\Driver\usbhub
\Driver\mouclass
\Driver\hidusb
\Driver\umbus
\Driver\asyncmac
There was noise introduced in the SSDT information returned due to paging of certain portions of the ntoskrnl.exe. We excluded all changes introduced due to paging out, and tagged data that had been paged in.
Cuckoo uses separate packages to instruct the analyser inside the guest machine to conduct the analysis procedure [6]. By default, Cuckoo provides packages to handle running dynamic link libraries (DLL), PDF, VBS and DOC files, among other packages. Cuckoo Sandbox is unable to process driver files for analysis by default. Since kernel-level malicious alteration is normally introduced by a malicious kernel module, we wanted the ability to run driver files alone to capture their pure behaviour.
The driver analysis package (sys package) gets invoked if the analyser identifies that the file is of native type. Since our guest machine is 32-bit, we restricted the analysis package to 32-bit driver files.
The sys package will invoke Sc.exe, which is provided in the Windows Resource Kit to register the service. This is done by running the command:
sc create newservicebinPath=<C:\path_to_file.sys> type=kernel start=auto error=normal
The default parameters used to create the service are:
Servicename=newservice
Type=kernel
Start=auto
Error=normal
Each parameter can be changed by the user when a sample is submitted for analysis.
‘Sc create’ is the equivalent of calling the CreateService Win32 API.
The sys package supports two ways to execute the driver file. The default method uses the NtLoadDriver Windows API. The other method for execution is using sc.exe by running the command:
sc start newservice
This is equivalent to calling the StartService Win32 API.
Using sc.exe, which is a command-line interface to the service control manager, takes care of the prep work necessary to register a service in the service control manager database.
‘sc create’ creates the service registry key under HKLM\System\CurrentControlSet\services, which both NtLoadDriver and ‘sc start’ use to start the service. The sys package also provides an option to try both methods (sc.exe and NtLoadDriver) to check which one succeeds.
Cuckoo provides an easy way to interpret the results of an analysis by matching the results via signatures. The signatures will look for predefined patterns in the results and flag them if they are present [6]. Each signature has an attribute called ‘severity’ that is used to define how malicious a signature is. This allows a user to write purely informative signatures in addition to ones that indicate malicious behaviour. (We explain more about the values we assigned to each signature to build a malicious index in section 3.2.)
We have written a set of signatures in order to identify certain modifications to the kernel data retrieved from an analysis task. Table 1 shows the signatures and their definitions.
| Signature name | Definition |
|---|---|
| generic_new_driver | Flags driver objects that have been created in the analysis job. |
| generic_modified_driver | Flags changes to already existing driver objects. |
| generic_deleted_driver | Flags driver objects that have been deleted during an analysis job. |
| generic_new_module | Flags new modules created during an analysis job. |
| generic_deleted_module | Identifies modules that were present before the analysis job took place, but which aren’t present anymore. |
| generic_modified_module | Identifies changes to properties such as size or address of a module. |
| generic_ssdt_hook | Identifies changes to the system service dispatch table. Namely, changes in the address of any of the system calls (and flags them). |
| generic_idt_hook | Identifies changes to the interrupt descriptor table of any processor. |
| generic_new_callback | Identifies new driver-supplied callbacks. We check: • LoadImageNotify • CreateThreadNotify • CreateProcessNotify• CmRegister (registry callbacks) |
| generic_modified_callback | Identifies changes to the table holding driver-supplied callbacks. |
| generic_attached_device | Identifies new devices added to driver objects. |
| generic_modified_mbr | Identifies if the SHA1 checksum of the MBR has changed during the analysis. |
| generic_modified_vbr | Identifies if the SHA1 checksum of the VBR has changed during the analysis |
| generic_modified_eod_size | Identifies if the size of the unformatted region beyond the file system at the end of disk has changed during the analysis. |
Table 1. Signatures and definitions.
We built a template in the Django framework used by Cuckoo to show all the information we gathered from an analysis task. The report is split into seven tabs, with each tab showing the information specific to a certain category in the results data container.
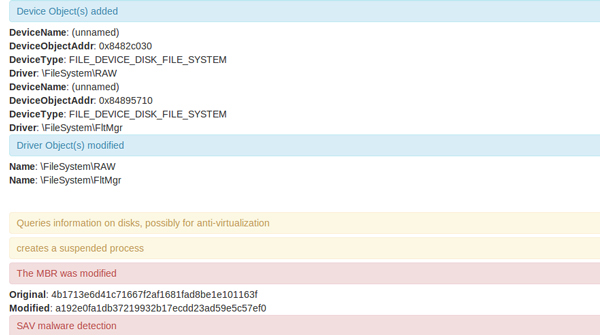
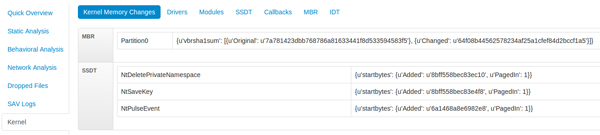
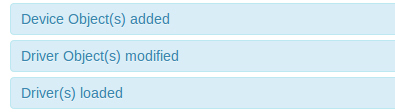
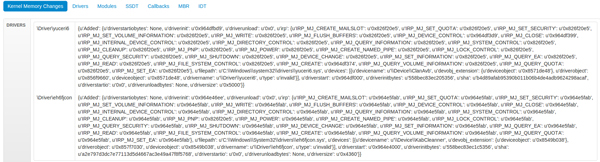
This category shows the changes to the kernel introduced during the analysis. For example, in Figure 1 we can see that a new device was attached to \Filesystem\FltMgr and \Filesystem\RAW. Also, the MBR SHA1 has been changed.
(Click here to view a larger version of Figure 1.)
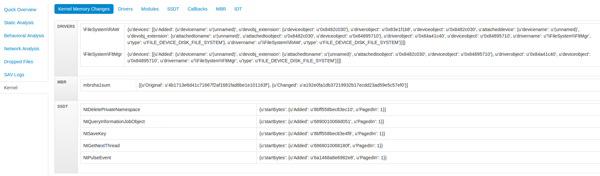
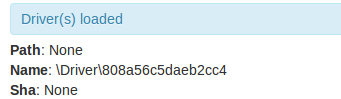
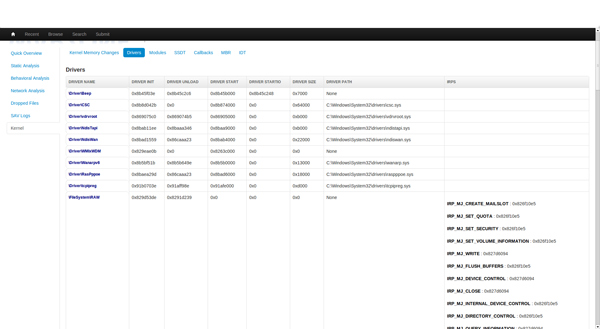
This section shows a breakdown of all the driver objects found in kernel memory after running the sample. The breakdown also shows the I/O request packet handlers for each object.
(Click here to view a larger version of Figure 2.)
This section shows all modules found on the system by enumerating the linked list of modules starting with ntoskrnl.exe. For each module we get the name, address and size.
(Click here to view a larger version of Figure 3.)
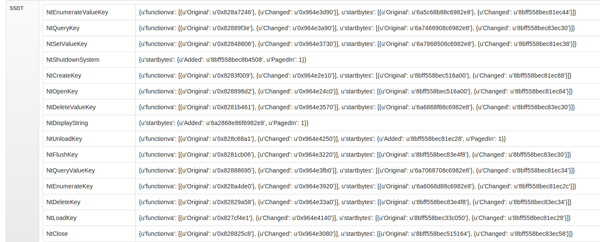
This section shows the entries in the system service dispatch table. For each system call we get its address and starting bytes. This shows if any inline hooks are added to the system calls.
(Click here to view a larger version of Figure 4.)
These sections show any callbacks installed by any drivers. For each callback we list its type, the driver path that installed it, the address and SHA1 of the driver.
(Click here to view a larger version of Figure 5.)
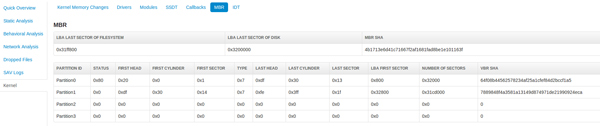
This section contains information available in the MBR and its SHA1. In addition to listing each partition’s detailed information by parsing the partition table entries, we also list the SHA1 of the VBR that this partition points to and the address of the last sector of the formatted file system and the last sector of disk.
(Click here to view a larger version of Figure 6.)
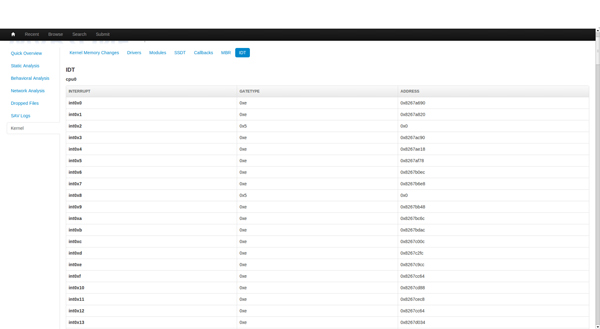
This section shows the descriptors in the interrupt descriptor table. For each descriptor we show its type and address.
(Click here to view a larger version of Figure 7.)
Approach
To assess the effectiveness of the system we tested three groups of samples. First, we picked a group of rootkits that were thoroughly documented and compared the results obtained from running the samples in our systems versus the behaviour documented by researchers. We also ran a set of known malicious driver files and a set of known clean driver files to analyse the results. Finally, we ran a set of known malicious standard executables and analysed the results obtained from them.
We picked a group of four well documented and researched rootkit samples to assess against our system. In cases where the report or blog article about the sample contained SHAs, we used those, otherwise we selected SHAs which we had previously analysed.
TDL has many variants. We tested a variant that employs an MBR infection technique to load its malicious driver. TDL4 is discussed thoroughly in [10], [11]. According to [10], on an x86 system, the kernel-mode drivers are tasked with maintaining the hidden file system to store the bootkit components, injecting the payload into system processes, and performing self-defence. The dropper tries to employ the print spooler provider load method to load its driver in kernel memory. The sample we looked at employed direct writes to disk by getting a handle to PhysicalDrive0 using NtCreateFile, and then used a sequence of DeviceIOControls to write to the disk, as explained in [11].
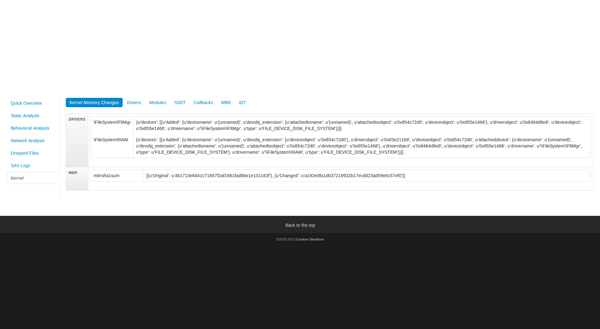
The SHA of the sample we analysed was c46ac210e06aad56dda12df3c0ccebb45108a745. Figure 8 and Figure 9 show the changes introduced in the kernel.
\Filesystem\RAW
{u’devicename’:u’(unnamed)’,
u’devobj_extension’:
  {u’deviceobject’: u’0x8482c030’},
u’driverobject’: u’0x83e1f1b8’,
u’deviceobject’: u’0x8482c030’,
u’attacheddevice’:
    {u’devicename’: u’(unnamed)’,
    u’devobj_extension’:
      {u’attachedtoname’: u’(unnamed)’,
      u’attachedtoobject’: u’0x8482c030’,
      u’deviceobject’: u’0x84895710’},
    u’driverobject’: u’0x84a41c40’,
    u’deviceobject’: u’0x84895710’,
    u’drivername’: u’\\FileSystem\\FltMgr’,
    u’type’: u’FILE_DEVICE_DISK_FILE_SYSTEM’},
u’drivername’: u’\\FileSystem\\RAW’,
u’type’: u’FILE_DEVICE_DISK_FILE_SYSTEM’}}]}

\Filesystem\FltMgr
{u’devicename’: u’(unnamed)’,
u’devobj_extension’:
    {u’attachedtoname’: u’(unnamed)’,
    u’attachedtoobject’: u’0x8482c030’,
    u’deviceobject’: u’0x84895710’},
u’driverobject’: u’0x84a41c40’,
u’deviceobject’: u’0x84895710’,
u’drivername’: u’\\FileSystem\\FltMgr’,
u’type’: u’FILE_DEVICE_DISK_FILE_SYSTEM’}}]}
(Click here to view a larger version of Figure 8.)
(Click here to view a larger version of Figure 9.)
What we observe from the changes to the driver objects are the changes seen in the DEVICE_OBJECTs relating to two drivers: \FileSystem\FltMgr and \FileSystem\RAW. If we examine the changes above, we see that a single device has been created and attached to the device pointed to by \Filesystem\RAW. That same device is now pointed to by \FileSystem\FltMgr. The DEVICE_OBJECT is represented as the one at address 0x84895710.
Another change is in the MBR SHA which indicates that the sample has written the malicious MBR to disk:
[{u’Original’:u’4b1713e6d41c71667f2af1681fad8be1e101163f’},
{u’Changed’: u’a192e0fa1db37219932b17ecdd23ad59e5c57ef0’}]
Finally, there are changes in the SSDT that are the result of paging in parts of the kernel. These are marked as paged in during processing of the raw results. While they might not necessarily be system calls made by the sample, they could lie within a page that was paged in and thus show up in the differencing (see Table 2).
| NtDeletePrivateNamespace | {u’startbytes’: {u’Added’: u’8bff558bec83ec10’, u’PagedIn’: 1}} |
| NtQueryInformationJobObject | {u’startbytes’: {u’Added’: u’6890010068d051’, u’PagedIn’: 1}} |
| NtSaveKey | {u’startbytes’: {u’Added’: u’8bff558bec83e4f8’, u’PagedIn’: 1}} |
| NtGetNextThread | {u’startbytes’: {u’Added’: u’6868010068180f’, u’PagedIn’: 1}} |
| NtPulseEvent | {u’startbytes’: {u’Added’: u’6a1468a8e6982e8’, u’PagedIn’: 1}} |
Table 2. Changes in the SSDT that are marked as paged in during processing of the raw results.
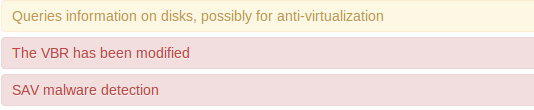
Gapz is a bootkit that is famous for its sophistication. It was thoroughly analysed in [12]. Gapz comes as two different variants: an MBR infector and a VBR infector. The MBR infecting version of the bootkit hijacks the boot process to hook the int 13 handler. The VBR-infecting variant only alters a DWORD: the ‘hidden_sectors’ value in the BIOS Parameter block of the VBR, which will instruct the VBR code to transfer control to a malicious loader instead of the standard IPL. The kernel-mode changes include writing blocks of its malicious kernel module to kernel memory in addition to hooks to IRP_MJ_INTERNAL_DEVICE_CONTROL and IRP_MJ_DEVICE_CONTROL handlers of the disk miniport driver. Both variants employ the same kernel-mode component.
The SHA of the VBR infector we used was 1f206ea64fb3ccbe0cd7ff7972bef2592bb30c84. As documented in [12], this sample injects the shellcode responsible for writing to disk into explorer.exe. The sample gets a handle to the volume and to the disk by calling NtCreateFile on GLOBALROOT\ArcName\multi(0)disk(0)rdisk(0)partition(1) and PhysicalDrive0, respectively. As with TDL, it issues a series of DeviceIOControls to write to them.
As can be seen in Figure 10 and Figure 11, the differencing identified a change in the VBR for partition 0.
{u’vbrsha1sum’: [{u’Original’: u’7a781423dbb768786a81633441f8d533594583f5’},
{u’Changed’: u’64f08b44562578234af25a1cfef84d2bccf1a5’}]}
(Click here to view a larger version of Figure 11.)
(Click here to view a larger version of Figure 12.)
We can also see changes in the SSDT that are showing as paged in calls (see Table 3).
| NtDeletePrivateNamespace | {u’startbytes’: {u’Added’: u’8bff558bec83ec10’, u’PagedIn’: 1}} |
| NtSaveKey | {u’startbytes’: {u’Added’: u’8bff558bec83e4f8’, u’PagedIn’: 1}} |
| NtPulseEvent | {u’startbytes’: {u’Added’: u’6a1468a8e6982e8’, u’PagedIn’: 1}} |
Table 3. Changes in the SSDT that are showing as paged in calls.
In our standard system set-up we did not capture the changes introduced in kernel memory during our standard test. We caught the write to the VBR, which is sufficient indication of malicious behaviour. The reason we could not see the kernel memory changes is because the dropper requests a reboot in order to kick off the VBR/MBR loading of its kernel-mode component.
In March 2014, German security firm G Data released a red paper which contained an analysis of the Uroburous rootkit [13]. Shortly afterwards, BAE Systems also released a comprehensive white paper on the rootkit [4]. The G Data paper indicated that the rootkit may have been involved in a Russian cyber attack against the US. Due to tensions between Russia and Ukraine at the time, multiple news companies covered the story, including the New York Times [14].
As described in [4] and [13], the rootkit comprises a driver and a virtual file system that is contained in a file on the disk. The rootkit creates an entry in the Interrupt Descriptor Table (IDT). The code for several functions in the SSDT is then hooked with an INT instruction (see [8] for details) that triggers the malicious software interrupt. A parameter is passed to the interrupt, identifying from which function it was called. This is used to look up a function in a custom dispatch table which executes the appropriate code for the hook.
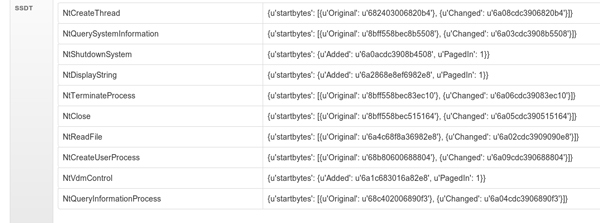
From running an analysis on sample 39e492e839ad47ab6b58608f0f6b7290b52122eb, we get the results shown in Figure 13. The results tell us that SSDT functions have been hooked, and that the IDT has been modified, which is consistent with the behaviour of Turla.
Upon closer inspection of the SSDT (see Figure 14), we can see that a number of functions have been modified. Functions like NtQuerySystemInformation and NtReadFile are often targeted by rootkits.
(Click here to view a larger version of Figure 14.)
The diff is showing that there is a difference in the first eight bytes of each function. Closer examination of the NtCreateThread start bytes reveals that it is only the first five bytes that have changed.
{u’startbytes’: [{u’Original’: u’682403006820b4’}, {u’Changed’: u’6a08cdc3906820b4’}]}On translating the modified bytes into assembly language we get:
6A08  push byte +0x8
CDC3  nt 0xc3
90    nop
Looking up the IDT entry at index 0xc3 on the IDT tab (see Figure 15), we see that the code for the interrupt is located at 0x8495a2b0. Cross referencing this address with the IDT entry in the kernel diff (Figure 16), we see that 0xc3 is the newly added IDT entry.
The Necurs rootkit was first discovered in May 2011[15] , but became well established in 2012. It was one of the first widespread rootkits to target x64 systems. It was originally packaged with fake anti-virus malware, but recently it has been used with the infamous Gameover Zeus variant [16]. Although it has been around for a while, the rootkit is as prevalent as ever.
Necurs is the name for the kernel-mode part of the rootkit. It consists of a driver file which, when installed on a system, works alongside other malware to hide its presence and make it difficult to remove. The way this is achieved differs depending on the processor architecture and operating system of the host computer. As our analysis system is only running on x86 Windows 7, we will only discuss the effects of the rootkit on this particular set-up.
When Necurs is installed on Windows 7, a service is created and the malicious driver is loaded. The driver hides the service and the driver file on disk by installing a file system filter driver. It also installs a LoadImageNotify callback to control which programs can be loaded.
By looking at the signatures (Figure 17 and Figure 18) after running a Necurs sample (412769f14bbc629a16208cda5fd6dc25e5f8e8bb), we see that a number of kernel modifications have occurred. These indicate that a new driver and a new callback have been installed.
Closer examination of the driver object (Figure 19) shows a name but no path. This means that our system could not access the driver. The most likely reason for this is that the driver is hidden. Something is hiding it from the file system, yet the driver object exists in memory. While this is not necessarily a malicious trait, it is certainly suspicious, and is worth investigating further.
The next point of interest is the addition of device objects. By looking at the kernel diff (Figure 20) we see that a device has been added to /FileSystem/FtlMgr, which is the file system filter manager. This is definitely of interest. Examination of the added data shows that the driver object related to the added device belongs to the newly added driver.
Similarly, examining the callback that has been added (Figure 21) also reveals that the code for the callback is contained in the newly added driver.
(Click here to view a larger version of Figure 21.)
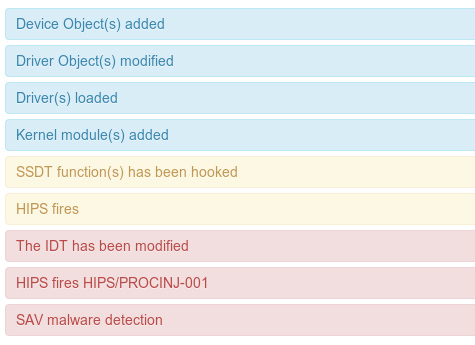
To summarize, the scan has revealed:
A new driver that is hidden
A file system filter
A LoadImageNotify callback
This collection of traits is indicative of rootkit-like behaviour, and is consistent with the behaviour of the Necurs rootkit.
To assess whether kernel memory differencing can be used to build a metric to decide if a sample is malicious, we performed two experiments. In the first experiment, we ran a group of malicious and clean 32-bit driver files and observed the changes in the kernel introduced by running the drivers. In the second experiment we ran a set of malicious standard executable files to find out what proportion of them introduced kernel memory changes.
We observed from our first experiment that not all successfully loaded drivers produced kernel memory data. From the set of successfully loaded malicious drivers, 82.3% produced kernel memory data that could be used later for differencing. From the clean set, 51.2% returned kernel memory data.
The reasons for failure were shared by clean and malicious drivers. A common reason was insufficient time for the log to be generated. Because the scan starts 105 seconds into the 120 seconds available for the analysis, and can take between 10 and 15 seconds, we sometimes miss the log by a second or two. Since the agent terminates before the machine shuts down fully, this is time taken from the 120 seconds. There is a trade-off between speed of analysis and data gathered. Our testing produced enough successful replication from malicious files for an automated analysis system.
From a set of malicious driver files:
Total drivers successfully loaded: 1,854
Total tasks with kernel data retrieved: 1,525
| Signature | Number of hits | Percentage |
|---|---|---|
| generic_new_driver | 1524 | 99.9 |
| generic_modified_driver | 1171 | 76.8 |
| generic_deleted_driver | 0 | 0 |
| generic_new_module | 1523 | 99.8 |
| generic_modified_module | 0 | 0 |
| generic_ssdt_hook | 30 | 1.96 |
| generic_idt_hook | 0 | 0 |
| generic_new_callback | 1332 | 87.3 |
| generic_modified_callback | 0 | 0 |
| generic_attached_device | 1149 | 75.3 |
| generic_new_device_links | 1441 | 94.5 |
| generic_modified_mbr | 0 | 0 |
| generic_modified_vbr | 0 | 0 |
| generic_modified_eod_size | 0 | 0 |
We expect that a successfully loaded driver would create a driver object and a new module. All of the malicious drivers created a new driver object on loading, except for one. This driver installed ‘CreateProcessNotify’ and ‘LoadImageNotify’ callbacks pointing to an ‘unknown/module’, and installed inline hooks at ‘NTEnumerateKey’ and ‘NtFlushInstructionCache’. This is indicative of highly suspicious behaviour.
(Click here to view a larger version of Figure 22.)
(Click here to view a larger version of Figure 23.)
Another interesting find was a sample that created a new driver object upon loading, but which did not show a newly added module in the differencing data. Looking at the job we find that the sample installs an SSDT hook by altering the VA of the service function ‘NtMapViewOfSection’. Again, this is highly suspicious behaviour.
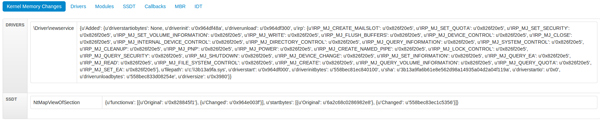
Figure 24. The sample installs an SSDT hook by altering the VA of the service function ‘NtMapViewOfSection’.
(Click here to view a larger version of Figure 24.)
From a set of running clean driver files:
Total drivers successfully loaded: 1,053
Total tasks with kernel data retrieved: 5,40
| Signature | Number of hits | Percentage |
|---|---|---|
| generic_new_driver | 539 | 99.8 |
| generic_modified_driver | 98 | 18.15 |
| generic_deleted_driver | 0 | 0 |
| generic_new_module | 539 | 99.8 |
| generic_deleted_module | 0 | 0 |
| generic_modified_module | 0 | 0 |
| generic_ssdt_hook | 15 | 2.77 |
| generic_idt_hook | 1 | 0.18 |
| generic_new_callback | 45 | 8.33 |
| generic_modified_callback | 0 | 0 |
| generic_attached_device | 74 | 13.70 |
| generic_new_device_links | 472 | 87.40 |
| generic_modified_mbr | 0 | 0 |
| generic_modified_vbr | 0 | 0 |
| generic_modified_eod_size | 0 | 0 |
These results show that the number of hits on newly created drivers corresponds to the hits on the new module. This makes sense, since a successfully loaded driver would also have added a module. An interesting finding was that on the Windows 7 machine, the percentage of samples that installed SSDT hooks was higher. Delving into those clean samples showed that they were either security software drivers that installed hooks in the SSDT or ones used for general system administration. For example, in Figure 25 we can see the SSDT hooks installed by regmon.sys from Microworld Technologies Inc.
(Click here to view a larger version of Figure 25.)
Another interesting sample was a clean driver that installed an IDT hook. Checking the results for that job shows that the driver also hooks NtOpenKey and NtCreateKey. Furthermore, it modifies the disk driver object by hooking an IRP, namely IRP_MJ_POWER. While it looks suspicious, this is actually a driver from Aladdin Knowledge Systems called ‘aksfridge.sys’ of ancillary function driver type. We are still investigating the function of this driver.
We collected a set of malicious PE files (detected by a static detection) and ran them for analysis to see whether our system can identify rootkit behaviour from executables.
First, we observed that the percentage of jobs that produced kernel memory data was much higher than any of the driver replication sets. This is positive news for us, since PE files constitute a large proportion of malicious files.
Number of malicious PEs: 319
Number of malicious PEs with kernel memory log: 303
| Signature | Number of hits | Percentage |
|---|---|---|
| generic_new_driver | 12 | 3.9 |
| generic_modified_driver | 14 | 4.6 |
| generic_deleted_driver | 0 | 0 |
| generic_new_module | 12 | 3.9 |
| generic_deleted_module | 0 | 0 |
| generic_modified_module | 0 | 0 |
| generic_ssdt_hook | 7 | 2.3 |
| generic_idt_hook | 1 | 0.3 |
| generic_new_callback | 0 | 0 |
| generic_modified_callback | 0 | 0 |
| generic_attached_device | 2 | 0.7 |
| generic_modified_mbr | 0 | 0 |
| generic_modified_vbr | 0 | 0 |
| generic_modified_eod_size | 0 | 0 |
It is clear that the number of malicious PEs that induced rootkit like behaviour was not large. We can still infer useful information by delving into the samples that triggered some of those signatures.
We can see an example of a sample that created two new driver objects in addition to installing an SSDT hook (Figure 26 and Figure 27). This sample is detected as Troj/NtRootK-DJ. The sample drops two driver files in %SYSTEM32%\drivers\. We could see the two objects for the two drivers created in addition to the SSDT hook installed below in the kernel memory differencing. By comparing the VAs, we see that the SSDT hook lies in the second driver.
(Click here to view a larger version of Figure 26.)
(Click here to view a larger version of Figure 27.)
Figure 28 is a screen capture of the kernel memory differencing produced by a sample of Mal/DownLdr-BZ. The sample drops a malicious driver file in several locations. The dropped driver file is detected as Mal/Rootkit-X. We can see that in the kernel memory differencing there is a newly attached device object to the PnP Manager driver. This device object is of type FILE_DEVICE_CONTROLLER. This could indicate that the sample is trying to hide the existence of malicious files. The type of the device in addition to the location to which it is attached is sufficiently interesting to warrant further investigation.
(Click here to view a larger version of Figure 28.)
Combining the data for all the malicious files versus all the clean files, we get a clearer picture of the high-contributing signatures. It is important to note that our set of malicious files is larger than the set of the clean files.
Total number of malicious files with kernel data: 1,828
Total number of clean files with kernel data: 540
| Signature | Malicious | Clean | Total hits |
|---|---|---|---|
| generic_new_driver | 1536 | 539 | 2075 |
| generic_modified_driver | 1185 | 98 | 1283 |
| generic_deleted_driver | 0 | 0 | 0 |
| generic_new_module | 1535 | 539 | 2074 |
| generic_deleted_module | 0 | 0 | 0 |
| generic_modified_module | 0 | 0 | 0 |
| generic_ssdt_hook | 37 | 15 | 52 |
| generic_idt_hook | 1 | 1 | 2 |
| generic_new_callback | 1332 | 45 | 1377 |
| generic_modified_callback | 0 | 0 | 0 |
| generic_attached_device | 1151 | 74 | 1225 |
| generic_modified_mbr | 0 | 0 | 0 |
| generic_modified_vbr | 0 | 0 | 0 |
| generic_modified_eod_size | 0 | 0 | 0 |
Combining the results above with our experience in analysing rootkits, we assigned maliciousness indexes to each signature following the Cuckoo signatures severity style. In Cuckoo, a signature’s severity field indicates its maliciousness. For example, a signature that triggers to highlight an action that is usually performed by clean software will have the lowest severity value of ‘1’. An action frequently performed by clean software will trigger a signature of a higher severity value, ‘2’. Actions that are largely only exhibited by malicious software will trigger a signature that has the highest severity value of ‘3.’
Our previous assumption that modifying the IDT or the SSDT should mainly be performed by malicious drivers proved to be incorrect. It transpires that the registration of a new callback is more suspicious than, for example, an SSDT hook. We showed earlier how a clean driver installed an IDT hook in addition to hooking the IRP table of the disk driver. An expected finding for us was the low severity of generic_new_driver and generic_new_module, since this is behaviour that can be induced by both clean and malicious files. Generic_ssdt_hook was also relatively low, but we attribute that to the high number of clean software security drivers in our clean set. Most of these will add SSDT hooks for monitoring purposes. We decided to make the severity of this signature medium. Generic_modified_driver, generic_new_callback and generic_attached_device provided most results from this experiment. We can assign a medium severity to those, since they are more likely to be performed by malicious files. For the rest of the samples where we did not get any hits, we assigned a severity based on past experience and our understanding of how malicious rootkits operate.
It became obvious from the results that no single signature from those that fired is a clear indication of maliciousness. Some were weighted when it came to malicious behaviour, but none were sufficiently high on their own. Some signatures failed to trigger so we had to resort to our experienced opinion to assign a severity level. Table 4 is a breakdown of the severity levels we assigned to indicate maliciousness.
| Signature name | Severity |
|---|---|
| generic_new_driver | 1 |
| generic_modified_driver | 2 |
| generic_deleted_driver | 1 |
| generic_new_module | 1 |
| generic_deleted_module | 1 |
| generic_modified_module | 2 |
| generic_ssdt_hook | 2 |
| generic_idt_hook | 2 |
| generic_new_callback | 2 |
| generic_modified_callback | 3 |
| generic_attached_device | 2 |
| generic_modified_mbr | 3 |
| generic_modified_vbr | 3 |
| generic_modified_eod_size | 3 |
Table 4. Breakdown of the severity levels we assigned to indicate maliciousness.
We have presented an automated analysis system that performs kernel memory differencing, focusing on identifying rootkit-like behaviour. After testing this system against some prevalent rootkits and a set of clean and malicious drivers we can draw several conclusions.
Primarily, we proved that the system successfully revealed rootkit manipulations in the cases of the prevalent rootkits tested. Although the system did not capture all the changes documented by other researchers, we believe that in a high throughput cluster environment, the amount of information provided will suffice to indicate maliciousness. Analysts using the system can then perform extensive research on the sample. Since the signatures can also match on specific data, this system will provide the opportunity to cluster samples based on induced kernel changes. For example, the system allows clustering of samples that add devices to \Filesystem\FltMgr or hook IRPs of the disk miniport driver. The signatures can even validate IRPs outside drivers by checking the size and address of ntoskrnl. Correlating changes in the kernel and validating them can be done on static snapshot data, which ensures authenticity, unlike trying to query volatile information on a live system.
Although we are getting good results, work remains to be done before the system is complete. First and foremost, the system must reliably be able to replicate every file that it receives.
It is still worth exploring the possibility of examining other areas of kernel memory. For instance, checking the functions exported by ntoskrnl for hooks (TDSS hooks IofCallDriver, which is a function exported by the kernel). As part of our future work we intend to improve the identification of modifications to modules. We currently only present the image base, size and name of a module. Additionally, research will be done into comparing individual kernel objects, to see if any useful information can be obtained as long as the analysis processing time is not increased too much.
An obvious enhancement to the system would be the ability to handle 64-bit files. At the moment the system does not have this functionality, but with common rootkits [2] now infecting x64 systems, this would be a worthwhile improvement.
Straying from the kernel, investigation will be conducted into the ability to detect user-mode rootkits building on the system we have already. Families like Beta Bot [17] utilize user-mode API hooking and other rootkit techniques in order to remain on system. This would be useful information to get from an automated analysis.
Finally, the reporting needs improvement in order to show where the same device is being attached to several driver objects. With more data being produced through the kernel memory scan like objects, ntoskrnl exports, we also intend to give more focus to devices.
Overall, we believe that such an automated system will provide greater visibility into the state and prevalence of rootkits in the wild. It will enhance the tracking of families and the identification of rootkit behaviour whether by clean or malicious files. It functions as a system that could flag malicious behaviour and also as an enabler to flag samples that could prove to be worthy of further investigation.
Sample clustering is not just a problem for rootkits, but for all malware, with numerous papers being penned on the subject. Identifying common behaviours and traits in large sample sets is a problem every anti-virus vendor faces. The system presented in this paper is not intended to solve sample clustering problems. However, we believe that it can serve as a platform for identifying behaviour exhibited by samples in ways that other systems cannot. For example, many rootkits will typically install a service and load a driver. This information alone cannot be relied on for clustering purposes. Our system exposes information per service and/or driver loaded, such as device names and types, that can be used to cluster samples. While the usual static and dynamic analysis methods provide a lot of data that can be used to cluster samples, the ability to access, dump, and diff areas of kernel memory gives a whole new dimension to the dataset.
Using the data exported by our system (as described in Section 2.1), it is possible to write signatures (as described in Section 2.4) which can be used to identify common traits. Clustering samples that, for example, commonly hook the same APIs, or insert devices into the device stack of the same drivers is a good way to group rootkits into the respective families.
As the next stage of this project we would like to expose the signature output to be utilized by our existing sample clustering system to increase the accuracy of clustering rootkit samples.
[1] Rootkit. Dictionary.com. http://dictionary.reference.com/browse/rootkit.
[2] Ferrie, P. The curse of Necurs – Part 1. Virus Bulletin, April 2014, p.4. http://www.virusbtn.com/pdf/magazine/2014/201404.pdf.
[3] DrWeb. BackDoor.Tdss.565 and its modifications (aka TDL3). http://www.drweb.com/static/BackDoor.Tdss.565_%28aka%20TDL3%29_en.pdf.
[4] BAE Systems. Snake campaign and cyber espionage toolkit. 2014. http://info.baesystemsdetica.com/rs/baesystems/images/snake_whitepaper.pdf.
[5] Gmer.net. http://www.gmer.net/.
[6] Cuckoo Sandbox. http://docs.cuckoosandbox.org/en/latest/.
[8] Intel 64 and IA-32 Architectures Software Developer Manuals. http://www.intel.com/content/dam/www/public/us/en/documents/manuals/64-ia-32-architectures-software-developer-manual-325462.pdf.
[9] OSDev.org. Partition Table. http://wiki.osdev.org/Partition_Table.
[10] Rodionov, E.; Matrosov, A. The Evolution of TDL: Conquering x64. http://www.eset.com/us/resources/white-papers/The_Evolution_of_TDL.pdf.
[11] Johnson, J. Alureon: The First ITW 64-Bit Windows Rootkit. Virus Bulletin. 2010. https://www.virusbtn.com/pdf/conference_slides/2010/Johnson-VB2010.pdf.
[12] Rodionov, E.; Matrosov, A. Mind the Gapz. http://www.welivesecurity.com/wp-content/uploads/2013/04/gapz-bootkit-whitepaper.pdf.
[13] G Data SecurityLabs. Uroburos Highly complex espionage software with Russian roots. 2014. https://public.gdatasoftware.com/Web/Content/INT/Blog/2014/02_2014/documents/GData_Uroburos_RedPaper_EN_v1.pdf.
[14] New York Times. Suspicion Falls on Russia as ‘Snake’ Cyberattacks Target Ukraine’s Government. 2014. http://www.nytimes.com/2014/03/09/world/europe/suspicion-falls-on-russia-as-snake-cyberattacks-target-ukraines-government.html.
[15] malware-lu. Necurs Quick Analysis. 2012. https://code.google.com/p/malware-lu/wiki/en_necurs_analysis.
[16] Wyke, J. Notorious “Gameover” malware gets itself a kernel-mode rootkit... NakedSecurity. February 2014. http://nakedsecurity.sophos.com/2014/02/27/notorious-gameover-malware-gets-itself-a-kernel-mode-rootkit/.
[17] MacDermid, K. Beta Bot – A Code Review. Arbour Networks. June 2013. http://www.arbornetworks.com/asert/2013/11/beta-bot-a-code-review/.
[18] Monthly Malware Statistics, May 2011. Securelist. 2011. http://www.securelist.com/en/analysis/204792214/Monthly_Malware_Statistics_May_2011.
[19] Zaki, A. Guntior bootkit up to new tricks. Naked Security. June 2013. http://nakedsecurity.sophos.com/2013/06/12/guntior-bootkit-up-to-new-tricks/.
![]()